Fast Upscaling with NVIDIA RTX Video Super Resolution in ComfyUI

Table of Contents
1. Introduction
In the world of video production and streaming, maintaining high-quality visuals is essential. NVIDIA RTX Video Super Resolution (VSR) is designed to enhance lower-resolution SDR videos by upscaling them up to 4× resolution while reducing common compression artifacts such as blockiness and banding. By leveraging NVIDIA’s AI acceleration on RTX GPUs, the technology can improve video clarity and sharpness.
It’s important to note that RTX Video Super Resolution is not designed to generate new details or reconstruct missing information like some AI super-resolution models. Instead, it acts as a fast and efficient video upscaler, improving perceived quality and reducing compression artifacts during the scaling process.
In this tutorial, we’ll walk through how to use RTX Video Super Resolution inside ComfyUI, a flexible node-based interface for AI workflows. The workflow itself is very straightforward, so there isn’t much configuration involved. Let's get started right away!
2. System Requirements for RTX Video Super Resolution
To run the RTX Video Super Resolution workflow, you’ll need the latest version of ComfyUI installed either locally or on a cloud GPU platform, along with a compatible NVIDIA RTX GPU. Since this workflow relies on NVIDIA’s RTX Video Super Resolution technology, it will only work on supported RTX graphics cards.
For the best experience, we recommend using a RTX 5090. A GPU of this class can upscale a 30-second video very quickly without any issues. However, keep in mind that longer videos can consume a significant amount of system RAM, which may lead to out-of-memory (OOM) errors. Because of this, it’s generally better to process short clips rather than very long videos when using this workflow.
If you don’t have access to a powerful local GPU like the RTX 5090, you can also run the workflow on a cloud GPU platform such as RunPod. This allows you to rent high-end GPUs on demand and run ComfyUI without needing expensive hardware locally.
Requirement 1: ComfyUI Installed & Updated
For a local Windows installation, follow this guide:
👉 How to Install ComfyUI Locally on Windows
For cloud GPU users, see this guide:
👉 How to Run ComfyUI on RunPod with Network Volume
In the next section, we will go over downloading the simple RTX Video Super Resolution workflow so you can get started with upscaling your videos quickly and efficiently.
3. Preparing ComfyUI: Workflow & Custom Nodes for Video Upscaling
With ComfyUI updated and ready, it’s time to download and load the workflow that will handle video upscaling.
Step 1: Download the Video Upscaler Workflow
👉 Video Upscaler: Download the RTX Video Super Resolution Video Upscaler Workflow JSON
While RTX Video Super Resolution works well for video, it can also be used for image upscaling. For still images, you can use the RTX Image Upscaler workflow:
👉 Image Upscaler: Download the RTX Video Super Resolution Image Upscaler Workflow JSON
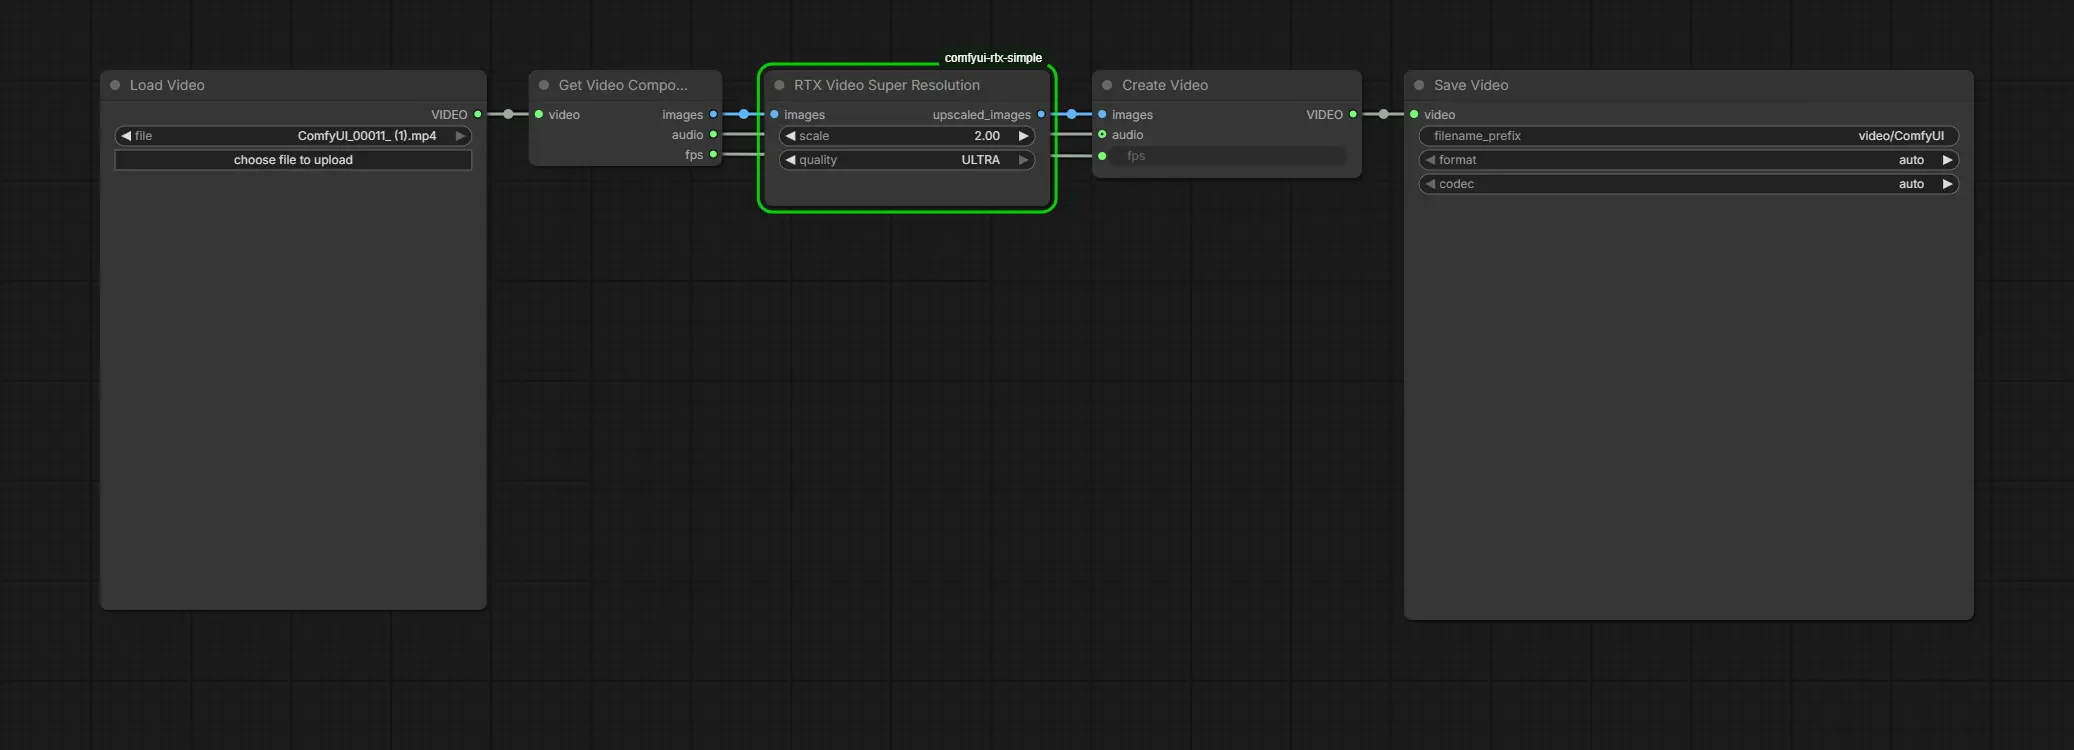
Step 2: Load Video Upscaler in ComfyUI
Launch ComfyUI, then drag and drop the downloaded JSON file onto the canvas. The workflow will automatically populate with all the required nodes:
-
LoadVideo – loads your input video.
-
GetVideoComponents – separates frames, audio, and FPS from the video.
-
RTXVideoSuperResolution – upscales the frames using NVIDIA’s RTX VSR technology.
-
CreateVideo – recombines the upscaled frames with audio to create a new video.
-
SaveVideo – exports the final upscaled video to your chosen folder.
Step 3: Install Missing Custom Nodes
If any nodes appear outlined in red, it means certain custom nodes aren’t installed yet. To fix this:
-
Click the Manager button in ComfyUI.
-
Select Install Missing Custom Nodes.
-
Click Install on the missing node (comfyui-rtx-simple), choosing the latest version.
-
Restart ComfyUI to register the new nodes.
After restarting, reload the canvas — all red outlines should now be gone. You only need to do this once. Once the missing nodes are installed, you’re ready to continue and generate your first upscaled video using the RTX Video Super Resolution workflow.
4. Render Time & Notes on RTX Video Super Resolution
Once your workflow is loaded and all custom nodes are installed, we can focus on running the upscaler and evaluating render times. Keep in mind this workflow is designed for fast video upscaling to enhance compression artifacts and overall clarity, it does not generate new detail.
Render Time Example:
| Key | Value |
|---|---|
| Video Length | 20 seconds |
| Input Resolution | 720 × 1280 |
| Upscale Factor | 2× |
| Output Resolution | 1440 × 2560 |
| GPU Used | RTX 5090 |
| Render Time | 17 seconds |
| Quality | ULTRA |
| Notes | Fast upscaling; enhances artifacts and clarity, it does not add new detail |
With the workflow loaded, custom nodes installed, and render times tested, you now have a fully functional RTX Video Super Resolution setup in ComfyUI. You’ve seen how fast it can upscale short clips to ULTRA quality, enhancing clarity and reducing compression artifacts without adding new details.
In the next section, we’ll wrap everything up with a Conclusion, summarizing key points, tips, and options for further upscaling workflows.
5. Conclusion
You now have a complete understanding of how to use NVIDIA RTX Video Super Resolution in ComfyUI for fast, artifact-enhancing video upscaling. This workflow is simple, lightweight, and extremely fast, making it ideal for short clips where you want to improve clarity and reduce compression artifacts.
Note: RTX Video Super Resolution does not generate new details — it improves perceived quality without reconstructing missing information.
For more advanced upscale workflows that add actual detail:
-
Image & Video Upscaling: We highly recommend exploring SeedVR2, which is designed to enhance and preserve fine details in still images. You can read our full tutorial here:
👉 High-Quality Image and Video Upscaling with SeedVR2 in ComfyUI
-
Video Upscaling: For videos where generating new details is important, consider FlashVSR, a workflow that goes beyond simple upscaling.
With these tools, you can select the workflow that best fits your quality versus speed needs, whether you want fast artifact enhancement or full detail reconstruction. Thanks for following along with this tutorial — we hope you’ll give these workflows a try and see the results for yourself!


