LTX 2.3 First Middle Last Frame Video Workflow in ComfyUI

Table of Contents
1. Introduction
Standard image-to-video generation gives you a starting frame and lets the model decide everything that happens next. That works well for organic, free-form motion — but what if you already know where you want the animation to end up, or what pose you want to hit halfway through? That's exactly the problem the First–Middle–Last Frame (FML) workflow solves.
In this tutorial you'll learn how to use LTX 2.3 in ComfyUI with the FML workflow: you supply all three anchor frames — a starting image, a midpoint image, and an ending image — and LTX 2.3 generates all the footage in between, smoothly interpolating motion, lighting, and detail across the full clip. The result is a directed animation that hits your intended beats without any post-production stitching.
This approach is perfect for product showcases, character pose transitions, cinematic camera arcs, or any project where you need the video to pass through a specific visual midpoint and arrive at a defined ending state. With all three frames locked in, LTX 2.3 has everything it needs to generate a fully directed, coherent animation from start to finish. We cover the full-quality FP8 workflow for high-VRAM GPUs — so read on to get everything set up and start generating.
2. System Requirements for LTX 2.3 FML (FP8 Workflow)
Before loading the workflow, make sure your environment is set up correctly. LTX 2.3 is a large 22B-parameter model. We recommend at least an RTX 4090 (24 GB VRAM) for the FP8 workflow, or a cloud GPU service like RunPod.
Requirement 1: ComfyUI Installed & Updated
You need ComfyUI installed locally or via cloud. For a local Windows setup:
👉 How to Install ComfyUI Locally on Windows
Once installed, open the Manager tab and click Update ComfyUI to ensure compatibility with the LTX 2.3 nodes this workflow requires.
If you don't have a high-end GPU locally, consider running ComfyUI on RunPod with a network volume for persistent storage:
👉 How to Run ComfyUI on RunPod with Network Volume
Requirement 2: Download LTX 2.3 FP8 Model Files
Download each model file below and place it in the correct ComfyUI folder.
| File Name | Hugging Face Download | ComfyUI Folder |
|---|---|---|
| ltx-2.3-22b-distilled_transformer_only_fp8_scaled_v3.safetensors | 🤗 Download | ..\ComfyUI\models\diffusion_models |
| MelBandRoformer_fp16.safetensors | 🤗 Download | ..\ComfyUI\models\diffusion_models |
| gemma_3_12B_it_fpmixed.safetensors | 🤗 Download | ..\ComfyUI\models\text_encoders |
| ltx-2.3_text_projection_bf16.safetensors | 🤗 Download | ..\ComfyUI\models\text_encoders |
| LTX23_audio_vae_bf16.safetensors | 🤗 Download | ..\ComfyUI\models\vae |
| LTX23_video_vae_bf16.safetensors | 🤗 Download | ..\ComfyUI\models\vae |
| taeltx2_3.safetensors | 🤗 Download | ..\ComfyUI\models\vae |
| ltx-2.3-spatial-upscaler-x2-1.0.safetensors | 🤗 Download | ..\ComfyUI\models\latent_upscale_models |
Requirement 3: Verify Folder Structure
Confirm your files are organized exactly like this before loading the workflow:
ts1📁 ComfyUI/
2└── 📁 models/
3    ├── 📁 diffusion_models/
4    │   ├── ltx-2.3-22b-distilled_transformer_only_fp8_scaled_v3.safetensors
5    │   └── MelBandRoformer_fp16.safetensors
6    ├── 📁 text_encoders/
7    │   ├── gemma_3_12B_it_fpmixed.safetensors
8    │   └── ltx-2.3_text_projection_bf16.safetensors
9    ├── 📁 vae/
10    │   ├── LTX23_audio_vae_bf16.safetensors
11    │   ├── LTX23_video_vae_bf16.safetensors
12    │   └── taeltx2_3.safetensors
13    └── 📁 latent_upscale_models/
14        └── ltx-2.3-spatial-upscaler-x2-1.0.safetensors
3. Download & Load the LTX 2.3 FML Workflow
With your environment and model files ready, it's time to load the workflow in ComfyUI.
Load the Workflow
👉 Download the LTX 2.3 First–Middle–Last Frame workflow JSON file and drag it directly onto your ComfyUI canvas.
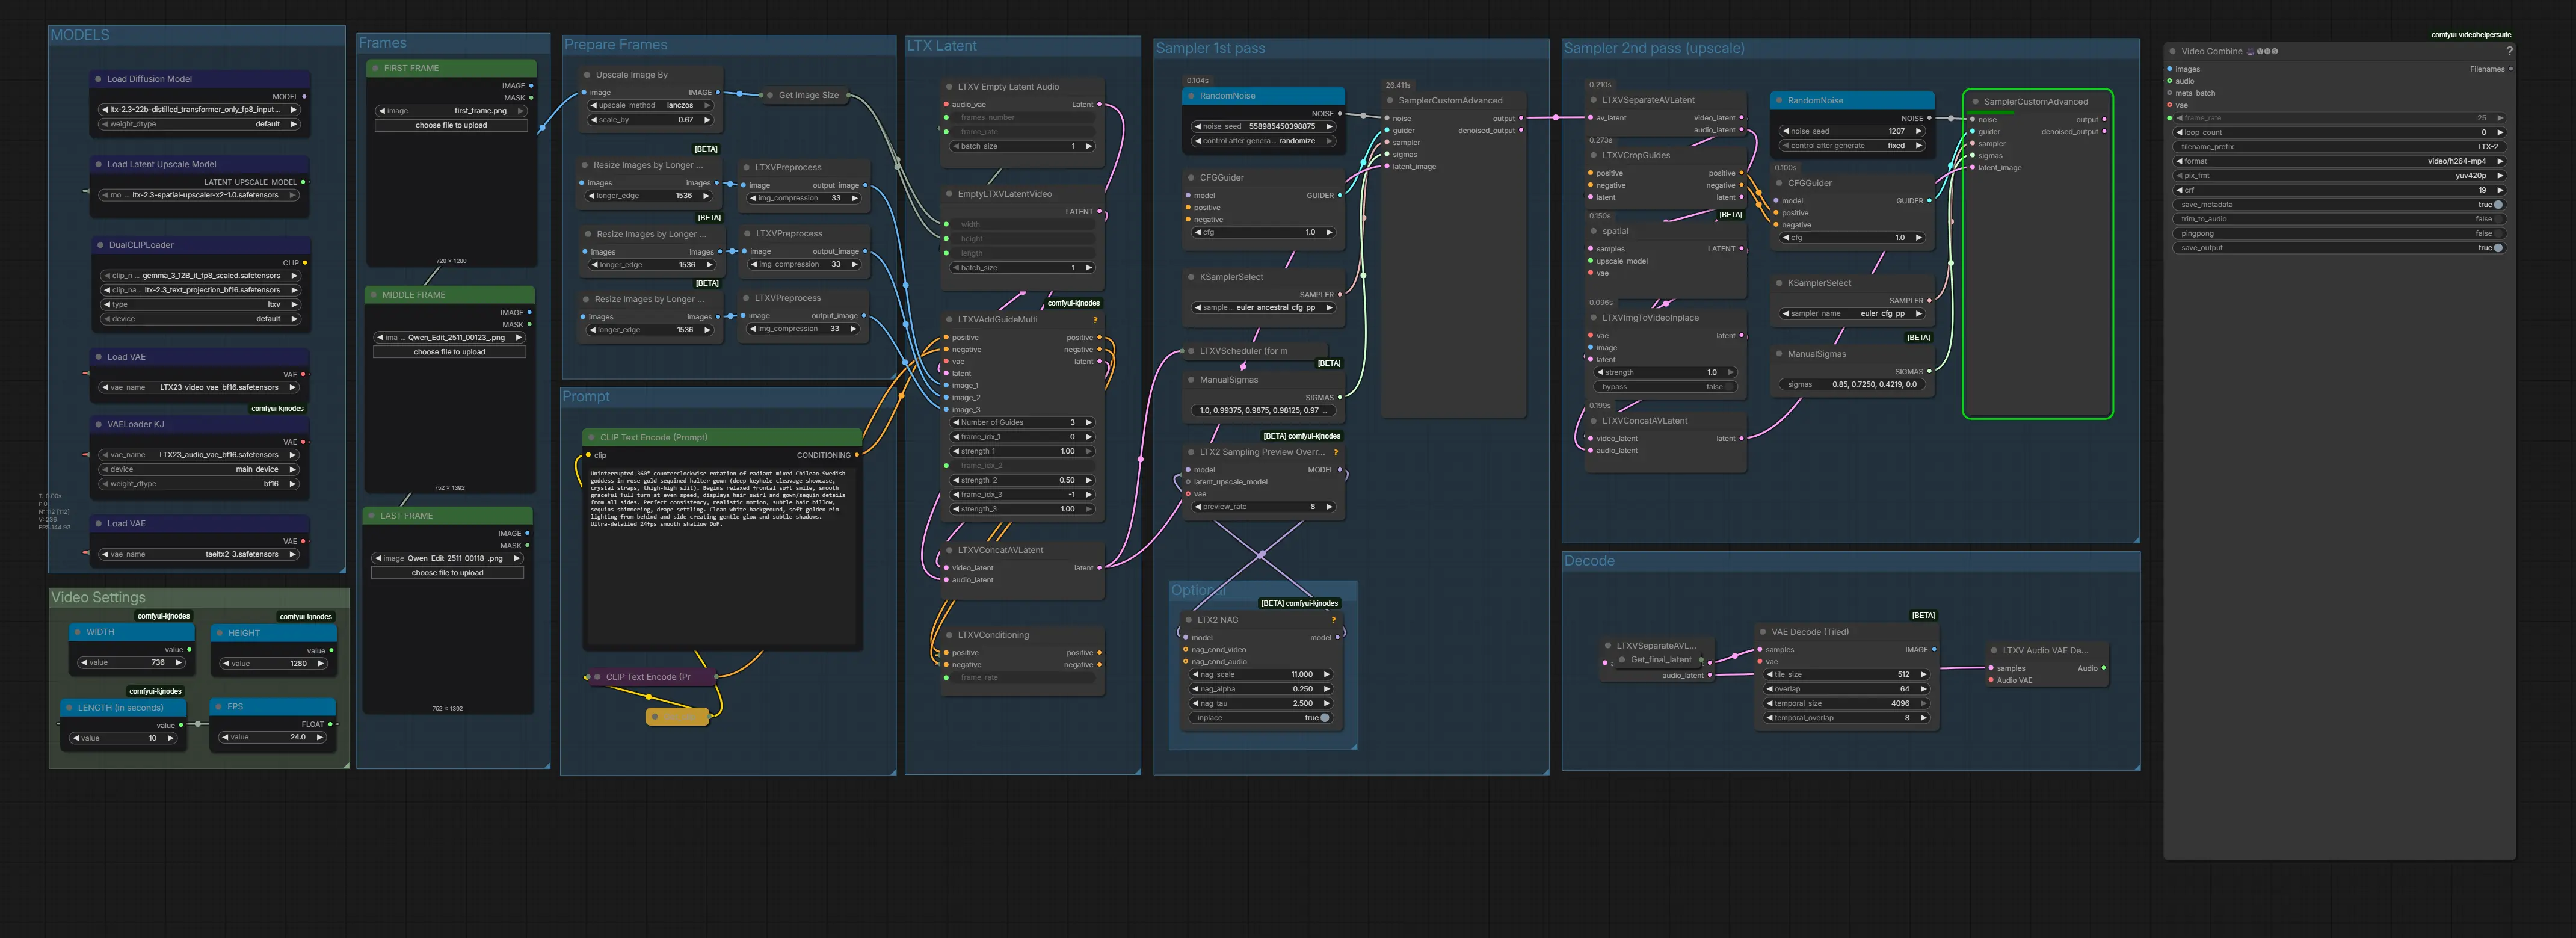
The workflow arrives fully pre-wired with all required nodes: three image loader inputs (First, Middle, Last), per-frame conditioning nodes, the LTX 2.3 distilled transformer, video VAE, dual samplers, and the spatial upscaler.
Install Missing Nodes
If any nodes appear in red after loading, open the Manager tab, click Install Missing Custom Nodes, and restart ComfyUI. Once everything loads cleanly, you're ready to configure your inputs.
4. Running the First–Middle–Last Frame Generation
With the workflow loaded and all nodes green, here is how to configure and run your first guided animation.
Step 1: Prepare & Upload Your Anchor Frame Images
Start by preparing the three images you'll use as keyframes. The First Frame is your opening image, the Middle Frame is the pose or moment you want to hit at the midpoint of the clip, and the Last Frame is where your animation ends up. All three are required — this workflow is specifically designed around three-point keyframe control. For example, you might supply three portraits of the same character in different poses — looking left, facing backwards, close up shot— and let LTX 2.3 generate the smooth movement in between.
 💡Consistency is key. Your anchor frames should share the same overall composition, subject scale, and lighting direction. Large jumps in framing or perspective between frames will produce warped or unstable interpolation. The model works best when the motion between keyframes is believable in a single continuous shot. For this tutorial, the First, Middle, and Last frames were created using the Qwen Multi Angle Workflow — a perfect companion tool for generating consistent multi-pose images ready to drop straight into this pipeline.
Step 2: Write Your Animation Prompt
Your text prompt steers the motion style, atmosphere, and character of the generated footage between your anchor frames. Because the model already knows where the animation starts and ends, you can focus your prompt on the quality of the transition rather than describing the endpoints.
Here's an example prompt for a smooth 360 animation:
ts1 Uninterrupted 360° counterclockwise rotation of radiant mixed Chilean-Swedish goddess in rose-gold sequined halter gown (deep keyhole cleavage showcase, crystal straps, thigh-high slit). Begins relaxed frontal soft smile, smooth graceful full turn at even speed, displays hair swirl and gown/sequin details from all sides. Perfect consistency, realistic motion, subtle hair billow, sequins shimmering, drape settling. Clean white background, soft golden rim lighting from behind and side creating gentle glow and subtle shadows. Ultra-detailed 24fps smooth shallow DoF.
Keep the camera description static and avoid prompting sudden or large movements — the anchor frames already define the endpoints, so large camera moves compete with the interpolation signal. Focus on motion smoothness, lighting consistency, and detail quality.
💡Use a negative prompt. Add terms like "jump cut, teleport, morph, dissolve, glitch, stutter, duplicate face, warped limbs" to your negative prompt to discourage the model from producing artifacts during the interpolated sections.
Step 3: Configure Video Settings
Set your output dimensions and video length in the Video Settings nodes — WIDTH, HEIGHT, LENGTH (in seconds), and FPS. For this tutorial we use 736 × 1280 at 24 fps for a 9:16 portrait video.
⚠️Important — Valid Parameter Rules: Width and height must be divisible by 32 (the workflow will round silently if you don't). Frame count must be divisible by 8, plus 1. Running with invalid parameters will not throw an error — the workflow silently uses the closest valid values.
Below is a reference table of common resolutions. We default to 720p (736 × 1280) for 9:16. For full 1080p quality on powerful GPUs (RTX 5090 or better), try 1088 × 1920.
| Aspect Ratio | Width | Height | Quality | VRAM |
|---|---|---|---|---|
| 9:16 (portrait) | 480 | 864 | Low / fast preview | Low |
| 9:16 (portrait) | 736 | 1280 | 720p — recommended default | Medium |
| 9:16 (portrait) | 1088 | 1920 | 1080p — high quality | High (RTX 5090+) |
| 16:9 (landscape) | 864 | 480 | Low / fast preview | Low |
| 16:9 (landscape) | 1280 | 736 | 720p — recommended | Medium |
| 16:9 (landscape) | 1920 | 1088 | 1080p — high quality | High (RTX 5090+) |
| 1:1 (square) | 768 | 768 | Social media square | Medium |
Step 4: Run the Generation
Once your anchor images, prompt, and video settings are configured, click RUN. LTX 2.3 runs two sampling passes — a fast distilled pass followed by a refinement pass — then decodes the video latents and renders the final output with the spatial upscaler applied.
The result is a single continuous video clip that starts from your First Frame, passes through your Middle Frame, and arrives at your Last Frame — with all motion, lighting, and detail smoothly generated in between.
5. Conclusion
Congratulations — you now have everything you need to create precisely directed image-to-video animations using LTX 2.3's First–Middle–Last Frame workflow in ComfyUI. From setting up your anchor images to writing a smooth-motion prompt and running the full two-pass generation, you've seen how straightforward the process is once everything is in place.
What makes this ComfyUI workflow genuinely powerful is the level of creative control it hands back to you. Standard image-to-video generation is great for organic, spontaneous motion — but LTX 2.3 FML keyframe generation lets you compose your animation. You define the start, the turning point, and the destination. LTX 2.3 fills in everything in between with smooth, coherent motion that respects all three of your anchor frames.
Whether you're creating product showcases that end on a specific hero shot, character animations that hit a defined pose, environmental transitions from day to dusk, or any other directed motion you can imagine — if you can supply the keyframes, this LTX 2.3 ComfyUI workflow can connect them.
Now it's your turn: pick your anchor images, write your prompt, and run the LTX 2.3 First–Middle–Last Frame workflow. Happy generating!


