Vision-Powered Prompting with Qwen 3VL in ComfyUI

Table of Contents
- 1. Introduction to Qwen 3VL in ComfyUI
- 2. System Requirements & Setup for Qwen 3VL
- 3. Installing the ComfyUI-QwenVL Custom Node
- 4. Understanding the Qwen 3VL Node
- 5. Example 1: Generating Image Prompts from Reference Photos
- 6. Example 2: Batch Image Analysis & Prompt Generation
- 7. Example 3: Video Analysis & Summarization
- 8. Creating a Custom Preset: Image → Animation Prompt
- 9. Conclusion: Smarter Prompting with Vision AI
1. Introduction to Qwen 3VL in ComfyUI
Qwen 3VL brings advanced vision-language understanding directly into your ComfyUI workflows, enabling you to generate detailed, accurate prompts from visual content automatically. Whether you're analyzing a single image to create a text-to-image prompt, studying video footage to build animation descriptions, or extracting style references from artwork, Qwen 3VL understands visual context and translates it into actionable text.
This multimodal model excels at understanding composition, lighting, subject matter, camera angles, and artistic style—making it perfect for workflows where you need to replicate or reference existing visual content. Instead of manually describing what you see, Qwen 3VL does the heavy lifting, generating prompts that capture the essence of your reference material.
In this tutorial, we'll walk through installing the ComfyUI QwenVL custom node, explore practical examples ranging from image analysis to video prompt generation, and show you how to customize the node with your own system prompts for specialized use cases.
2. System Requirements & Setup for Qwen 3VL
Unlike traditional ComfyUI workflows that require manual model downloads, the ComfyUI-QwenVL custom node handles everything automatically. On your first run, the node will download all necessary model files, making setup remarkably straightforward. However, you'll still need adequate hardware to run the vision model efficiently.
Hardware Requirements
Qwen 3VL is a multimodal vision-language model that requires decent GPU memory for smooth operation:
Recommended Setup:
-
GPU: NVIDIA RTX 4090, RTX 5090, or equivalent with 24GB+ VRAM
-
RAM: 32GB+ system memory
-
Storage: At least 50GB free space for model files (downloaded automatically)
Cloud GPU Alternative:
If your local GPU doesn't meet these requirements, running ComfyUI on a cloud service like RunPod is highly recommended. You can set up a persistent network volume that stores your models and workflows, allowing you to switch between GPU instances as needed.
👉 How to Run ComfyUI on RunPod with Network Volume
Software Requirements
Requirement 1: ComfyUI Installed
You'll need ComfyUI installed either locally or on a cloud GPU service.
-
Local Windows installation: Follow the standard ComfyUI setup guide
-
Cloud GPU (RunPod): Use the ComfyUI template with persistent storage
Requirement 2: Update ComfyUI
Before installing custom nodes, ensure ComfyUI is up to date:
For Windows Portable Users:
-
Navigate to: ...\ComfyUI_windows_portable\update
-
Run update_comfyui.bat
For RunPod Users:
bash
bash1 cd /workspace/ComfyUI && git pull origin master && pip install -r requirements.txt && cd /workspace
💡 Note: The ComfyUI-QwenVL node will automatically download required models on first use—no manual file placement needed!
3. Installing the ComfyUI-QwenVL Custom Node
Installing the Qwen 3VL custom node is straightforward using ComfyUI Manager.
Install via ComfyUI Manager
-
Open ComfyUI in your browser
-
Click the Manager button (if ComfyUI Manager is installed)
-
Select Custom Nodes Manager
-
Search for "ComfyUI-QwenVL" (Author: AILab)
-
Click Install next to "ComfyUI-QwenVL" (Latest version)
-
Restart ComfyUI
After restarting, you can now add the QwenVL node to your canvas. Simply double-click on the canvas and search for "QwenVL" and you'll see the available QwenVL nodes ready to import. Below is an example of the QwenVL node which we have imported onto the canvas:
Automatic Model Download
The first time you run a workflow using the QwenVL node, the required model files are downloaded automatically. No manual setup or file placement is required.
The model files are stored in the following directory:
ts1 ComfyUI/models/LLM/Qwen-VL/Qwen3-VL-2B-Instruct
The final folder name corresponds to the specific model you selected and ran. If you choose a different QwenVL model, a new folder will be created for that model accordingly.
Next Steps
Before jumping into real-world examples, it’s important to understand what goes into the QwenVL node, what comes out of it, and how its key options affect the results. In the next section, we’ll walk through the node’s interface, input types, custom prompts, and generation controls so you know exactly how to use it effectively in your workflows.
4. Understanding the Qwen 3VL Node
Once the QwenVL node is installed and added to your canvas, you’ll see a compact but powerful interface designed specifically for vision-based analysis. Rather than overwhelming you with options, the node focuses on a clear input → interpretation → text output structure.
Let’s break down exactly what the node is made of and how each part works.
Visual Input (Image or Video)
At the top of the node, you’ll notice two input sockets:
-
Image – Used when analyzing a single image
-
Video – Used when analyzing a video clip
Only one input type is used at a time. You connect either an image loader or a video loader to the corresponding input, depending on your task. There is no ambiguity here—Qwen 3VL always analyzes exactly what you feed into it.
The node then outputs a single RESPONSE text string, which can be:
-
Displayed in a text preview node
-
Saved to a file
-
Passed directly into another node (for example, a text-to-image or video generation node)
Model & Performance Settings
These dropdowns define how the model runs under the hood.
Model Name
-
Example: Qwen3-VL-2B-Instruct
-
This determines which Qwen vision-language model is used for analysis.
Quantization
-
Example: None (FP16)
-
Controls memory usage and precision. FP16 offers higher accuracy at the cost of VRAM.
Attention Mode
- Selected: flash_attention_2
Because this workflow uses a Custom RunPod ComfyUI Template with Flash Attention installed, flash_attention_2 is enabled. This provides:
-
Faster inference
-
Lower memory overhead
-
Noticeable performance improvements during image and video analysis
In practice, Flash Attention can speed up analysis by a noticeable percentage compared to standard attention methods—especially when working with higher-resolution images or longer video clips.
👉 If Flash Attention is not installed on your system, simply select auto from the dropdown. The node will automatically fall back to a compatible attention mode, ensuring everything still works correctly without any additional setup.
Preset Prompts vs Custom System Prompt
The QwenVL node uses system prompts to define how visual content is interpreted and described.
Preset Prompt\
Out of the box, the node includes the following preset prompt options:
-
Tags
-
Simple Description
-
Detailed Description
-
Ultra Detailed Description
-
Cinematic Description
-
Detailed Analysis
-
Video Summary
-
Short Story
-
Prompt Refine & Expand
Each preset is optimized for a different type of output—ranging from concise tag-style descriptions to cinematic breakdowns and refined text-to-image prompts.
Custom Prompt (System Prompt Box)
-
Any text entered into the custom_prompt field will override the selected preset
-
This allows you to fully control the model’s behavior with your own instructions
In other words:
-
Use Preset Prompts for fast, standardized workflows
-
Use a Custom Prompt when you need highly specific or specialized analysis
You never need both at the same time—custom prompts always take priority.
💡 Coming Up Later in This Tutorial:\
We’ll cover how to extend these preset options and create your own custom presets that appear directly in the dropdown menu. This is especially useful if you regularly analyze images or videos in a very specific way, such as for cinematography, product photography, 3D asset creation, or animation planning.
Output Controls
| Setting | Description | Notes / Examples |
|---|---|---|
| Max Tokens | Sets how long the response can be | Higher values allow more detailed analysis; typical range: 300–1000 tokens |
| Seed | Controls reproducibility | Using the same seed can produce similar outputs across runs |
| Keep Model Loaded | Keeps the model in VRAM between runs | Useful for repeated analyses without reload delays |
| Control After Generate | Determines whether the seed changes after each generation | Example: randomize |
In the next section, we’ll walk through real-world examples/workflows using Qwen 3VL, starting with one of the most common and powerful use cases: generating high-quality image prompts from reference photos. You’ll see exactly how to configure the node, which presets to choose, and how to turn a single image into a detailed, ready-to-use prompt for image generation models.
5. Example 1: Generating Image Prompts from Reference Photos
One of the most practical applications of Qwen 3VL is its ability to generate accurate prompts from reference images. This feature is particularly useful for artists and creators who want to replicate or draw inspiration from existing visuals without the hassle of manual description. Let’s explore a specific use case: generating prompts from portrait photography.
Use Case: Image Analysis & Detailed Prompt
Imagine you have a fashion or character photo and wish to create a similar image using tools like Flux or Z-Image Turbo. Here's how to extract a detailed prompt using Qwen 3VL:
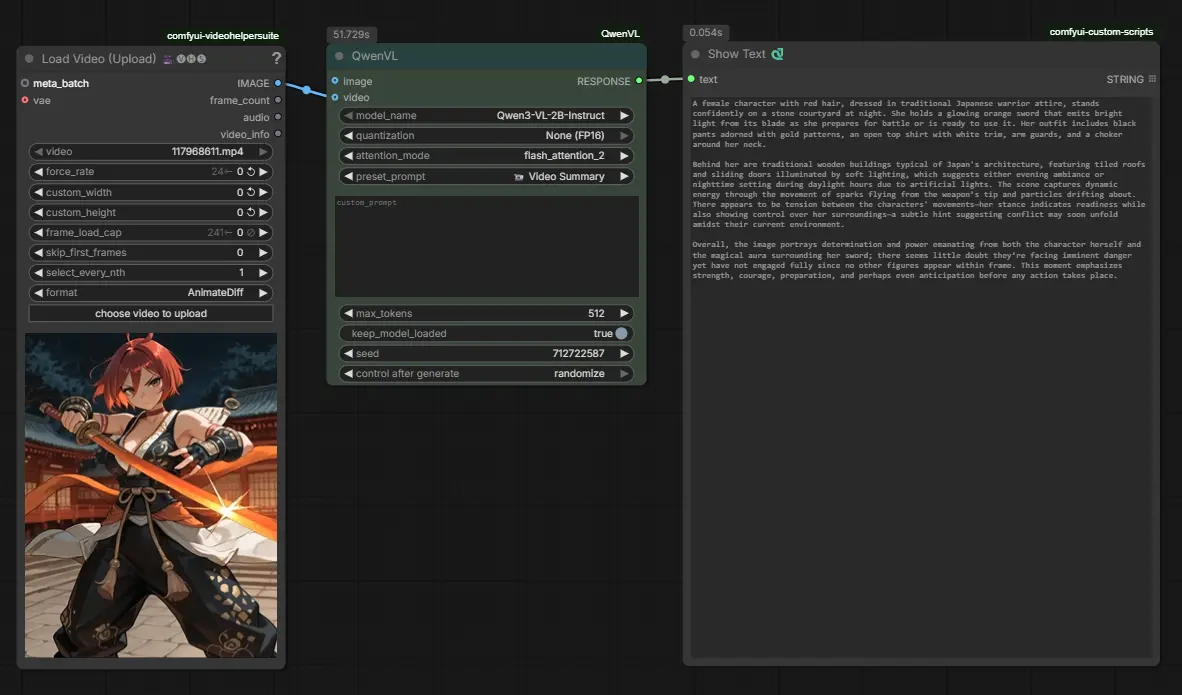
Step 1: Load Your Reference Image
Begin by loading your reference image into the workflow. This could be a professional portrait photo featuring a subject with natural lighting and a soft-focus background.
Step 2: Configure the QwenVL Node & Run the workflow
To enable image-based analysis, you need to place a Load Image node before the QwenVL node and a Show Text node after it.
-
Add a Load Image node
-
Place the Load Image node at the beginning of the workflow.
-
Configure it to load the image you want the model to analyze.
-
This node will provide the image input required by QwenVL.
-
-
Configure the QwenVL node
-
Connect the output of the Load Image node to the QwenVL node.
-
In the QwenVL settings:
- System Prompt: Select “Detailed Description” to ensure a comprehensive and structured analysis of the image.
-
-
Add a Show Text node
-
Place a Show Text node after the QwenVL node.
-
Connect the QwenVL text output to the Show Text node.
-
This node will display the generated description or analysis result.
-
Once connected, the workflow should look something like this:
 This output functions as a ready-to-use image generation prompt, capturing key elements such as composition, style, lighting, and overall mood. You can copy the text directly from the Show Text node for later use, or feed the Show Text node straight into a Prompt node to generate a new image directly from an existing one.
Step 4: Reuse the Prompt for Image Generation\
You can now take this generated prompt and use it with image generation models such as Flux or Z-Image Turbo. By pasting the prompt into a Flux Dev or Z-Image Turbo workflow and running it, you can recreate or reinterpret the original image with impressive consistency. Below is an example of images generated by copying this prompt and running it in both Flux Dev and Z-Image Turbo, showcasing how effectively the prompt translates across different models.
 🔥 See how easily you can grab prompts from existing images and reuse them to generate stunning new visuals!
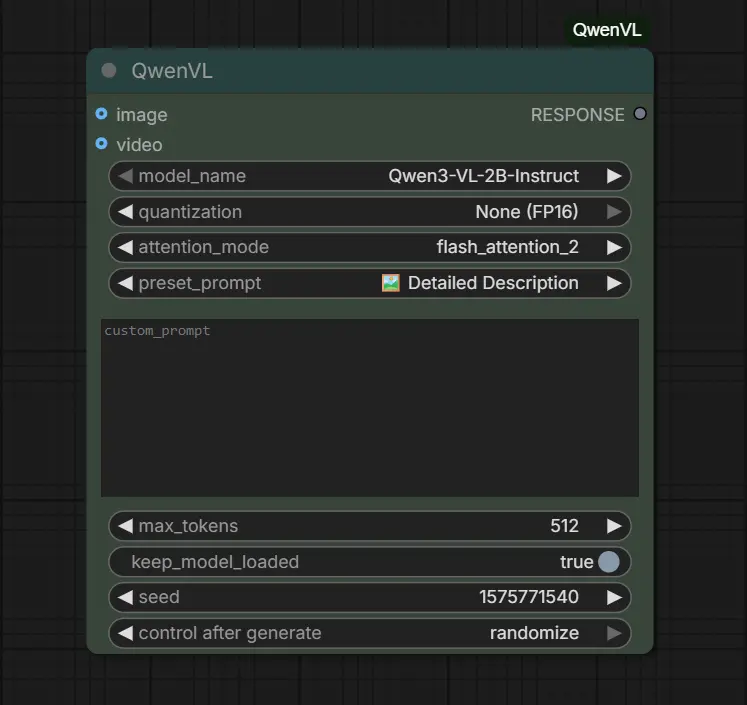
6. Example 2: Batch Image Analysis & Prompt Generation
In addition to analyzing single images, Qwen 3VL can also process entire folders of images in one run, making it ideal for large-scale prompt extraction, dataset creation, or rapid visual analysis. The workflow is almost identical to the previous example—the only difference is the first node.
Instead of using a Load Image node, this workflow uses an Image Batch Path node. This node allows Qwen 3VL to automatically iterate over multiple images stored in a folder and analyze them sequentially.
To use this node, you’ll need to install a custom extension:
-
Custom Node: ComfyUI-JoyCaption
-
Author: AILab
-
Installation: Available directly through the ComfyUI Node Manager
Once installed, restart ComfyUI and add the Image Batch Path node at the start of the workflow and specify the folder path relative to your ComfyUI directory. For example, setting the input field to: input will load all images located in the ComfyUI/input folder.
The rest of the workflow remains unchanged—connect the Image Batch Path node to QwenVL, keep the system prompt set to Detailed Description, and attach a Show Text node to view the results. From there, you can simply run the workflow, and Qwen 3VL will analyze every image in the folder, generating a detailed, ready-to-use prompt for each one. These prompts can be copied directly, stored for later use, or piped into image generation models like Flux or Z-Image Turbo for fully automated batch generation.
🔥 This approach makes it incredibly easy to turn entire image folders into high-quality prompts with minimal setup and zero manual description work.
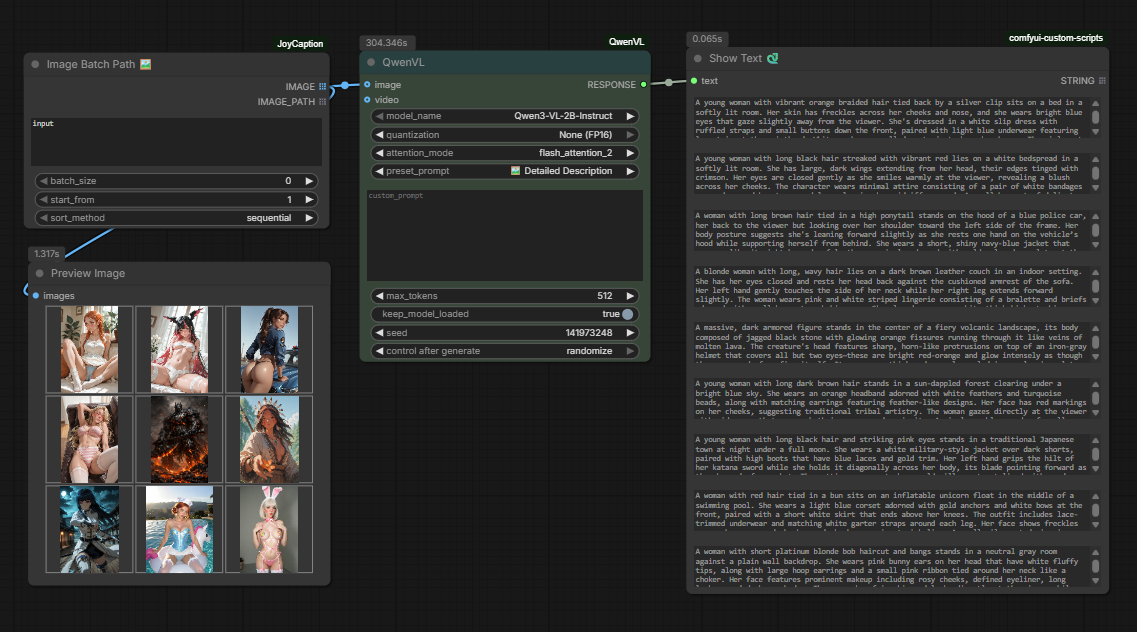
7. Example 3: Video Analysis & Summarization
Beyond images, Qwen 3VL can also analyze video content, making it a powerful tool for understanding motion, scenes, and narrative structure across time.
In this workflow, a Load Video node is used instead of an image input. The video is passed directly into the QwenVL node, where analysis is handled using one of the built-in preset options.
Qwen 3VL includes a default dropdown option called “Video Summary”, which is specifically designed for video understanding. When selected, the model automatically analyzes the uploaded video and generates a structured summary that can include:
-
Scene progression and visual transitions
-
Character appearance and actions
-
Environmental details and lighting changes
-
Overall mood, pacing, and narrative context
The generated output is then displayed using a Show Text node, just like in the image-based workflows.
This makes it easy to extract meaningful descriptions from video files—whether you’re working with animations, cinematics, reference footage, or short clips—without any additional configuration. Simply load a video, select Video Summary, and run the workflow.
What’s Next?
While the built-in Video Summary option works great out of the box, it’s only the starting point. In the next section, we’ll create our own custom dropdown option, designed specifically to analyze an image and return a ready-to-use animation prompt.
8. Creating a Custom Preset: Image → Animation Prompt
One of the most powerful features of the Qwen 3VL integration in ComfyUI is that the preset dropdown options are fully customizable. This allows you to go beyond the built-in analysis modes and define your own purpose-driven presets—such as generating animation-ready prompts directly from a single image.
To create a custom preset, navigate to the following file:
ts1 ComfyUI/custom_nodes/ComfyUI-QwenVL/AILab_System_Prompts.json
This file controls both:
-
Which options appear in the Qwen 3VL preset dropdown
-
What system prompt is used when a specific option is selected
Adding the Preset to the Dropdown
At the top of the file, locate the _preset_prompts list. This array defines the visible dropdown options inside ComfyUI.
Add your new preset label to this list, for example:
🔥 Image → Animation Prompt
Placing it near the top makes it easier to access, but the position is entirely up to you.
Defining the Preset Behavior (qwenvl)
Next, inside the qwenvl object, add a new entry using the exact same name as the dropdown label. This entry defines how Qwen 3VL should analyze the image and what kind of output it should produce.
Below is an example of a high-quality system prompt designed specifically to convert an image into a professional, animation-ready prompt:
{"🔥 Image → Animation Prompt": "Analyze the image and write ONE continuous animation prompt paragraph (180–300 words), describing only what is visually present and logically inferable. Start immediately with the animated scene—no preface, no explanation, no labels, and no <think>. Describe the subject(s), appearance, pose, and environment in detail, inferring natural motion from the scene such as body movement, hair and clothing motion, and environmental dynamics like wind, particles, or shifting light. Describe camera behavior suitable for animation, including framing, angle, distance, subtle camera movement (pan, tilt, dolly, slow push-in), depth of field changes, and smooth motion continuity. Include lighting behavior over time such as flicker, glow, shifting highlights, and moving shadows, as well as any visible atmospheric effects like fog, embers, rain, or dust that enhance animation realism. Maintain temporal coherence and a smooth flow of motion throughout, and write the output as a professional, animation-ready prompt suitable for video or diffusion-based animation models.}"
⚠️ Important:\
The preset name in _preset_prompts and the corresponding key inside the qwenvl object must match exactly, including emojis, or the option will not appear correctly in the Qwen 3VL dropdown.
Finalizing and Using the Preset
After adding the new preset:
-
Save the AILab_System_Prompts.json file
-
Restart ComfyUI
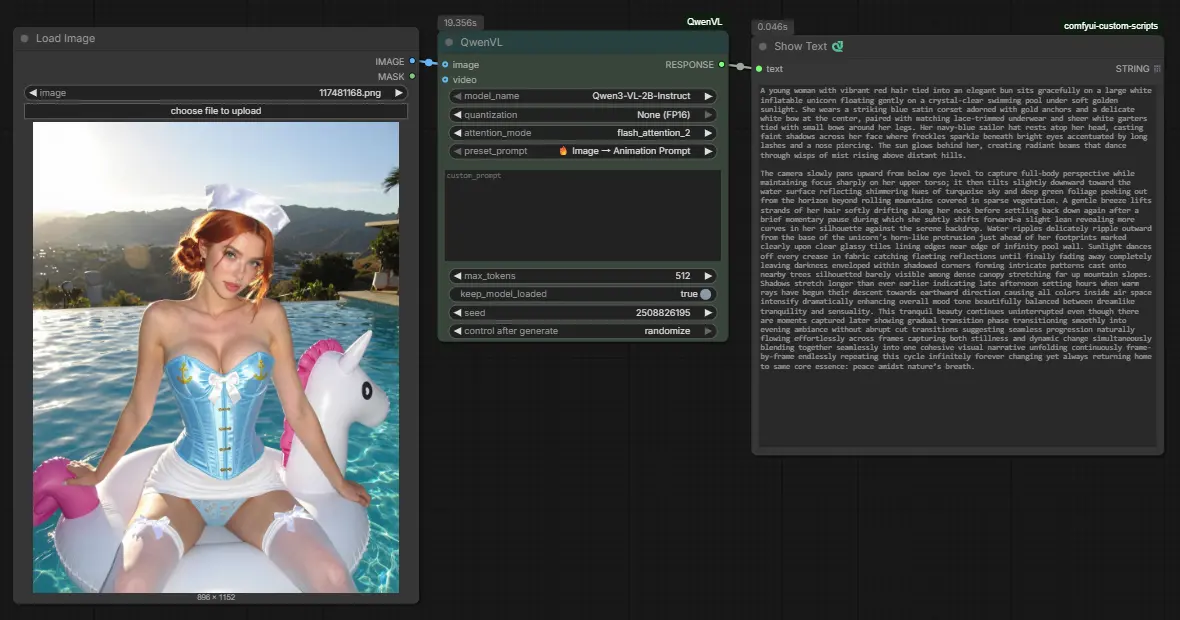
Once restarted, the 🔥 Image → Animation Prompt option will be available in the preset dropdown. Selecting it allows you to analyze any image and instantly receive a motion-aware, animation-focused prompt—ready to be fed directly into WAN 2.2, video diffusion models, or fully automated animation workflows.
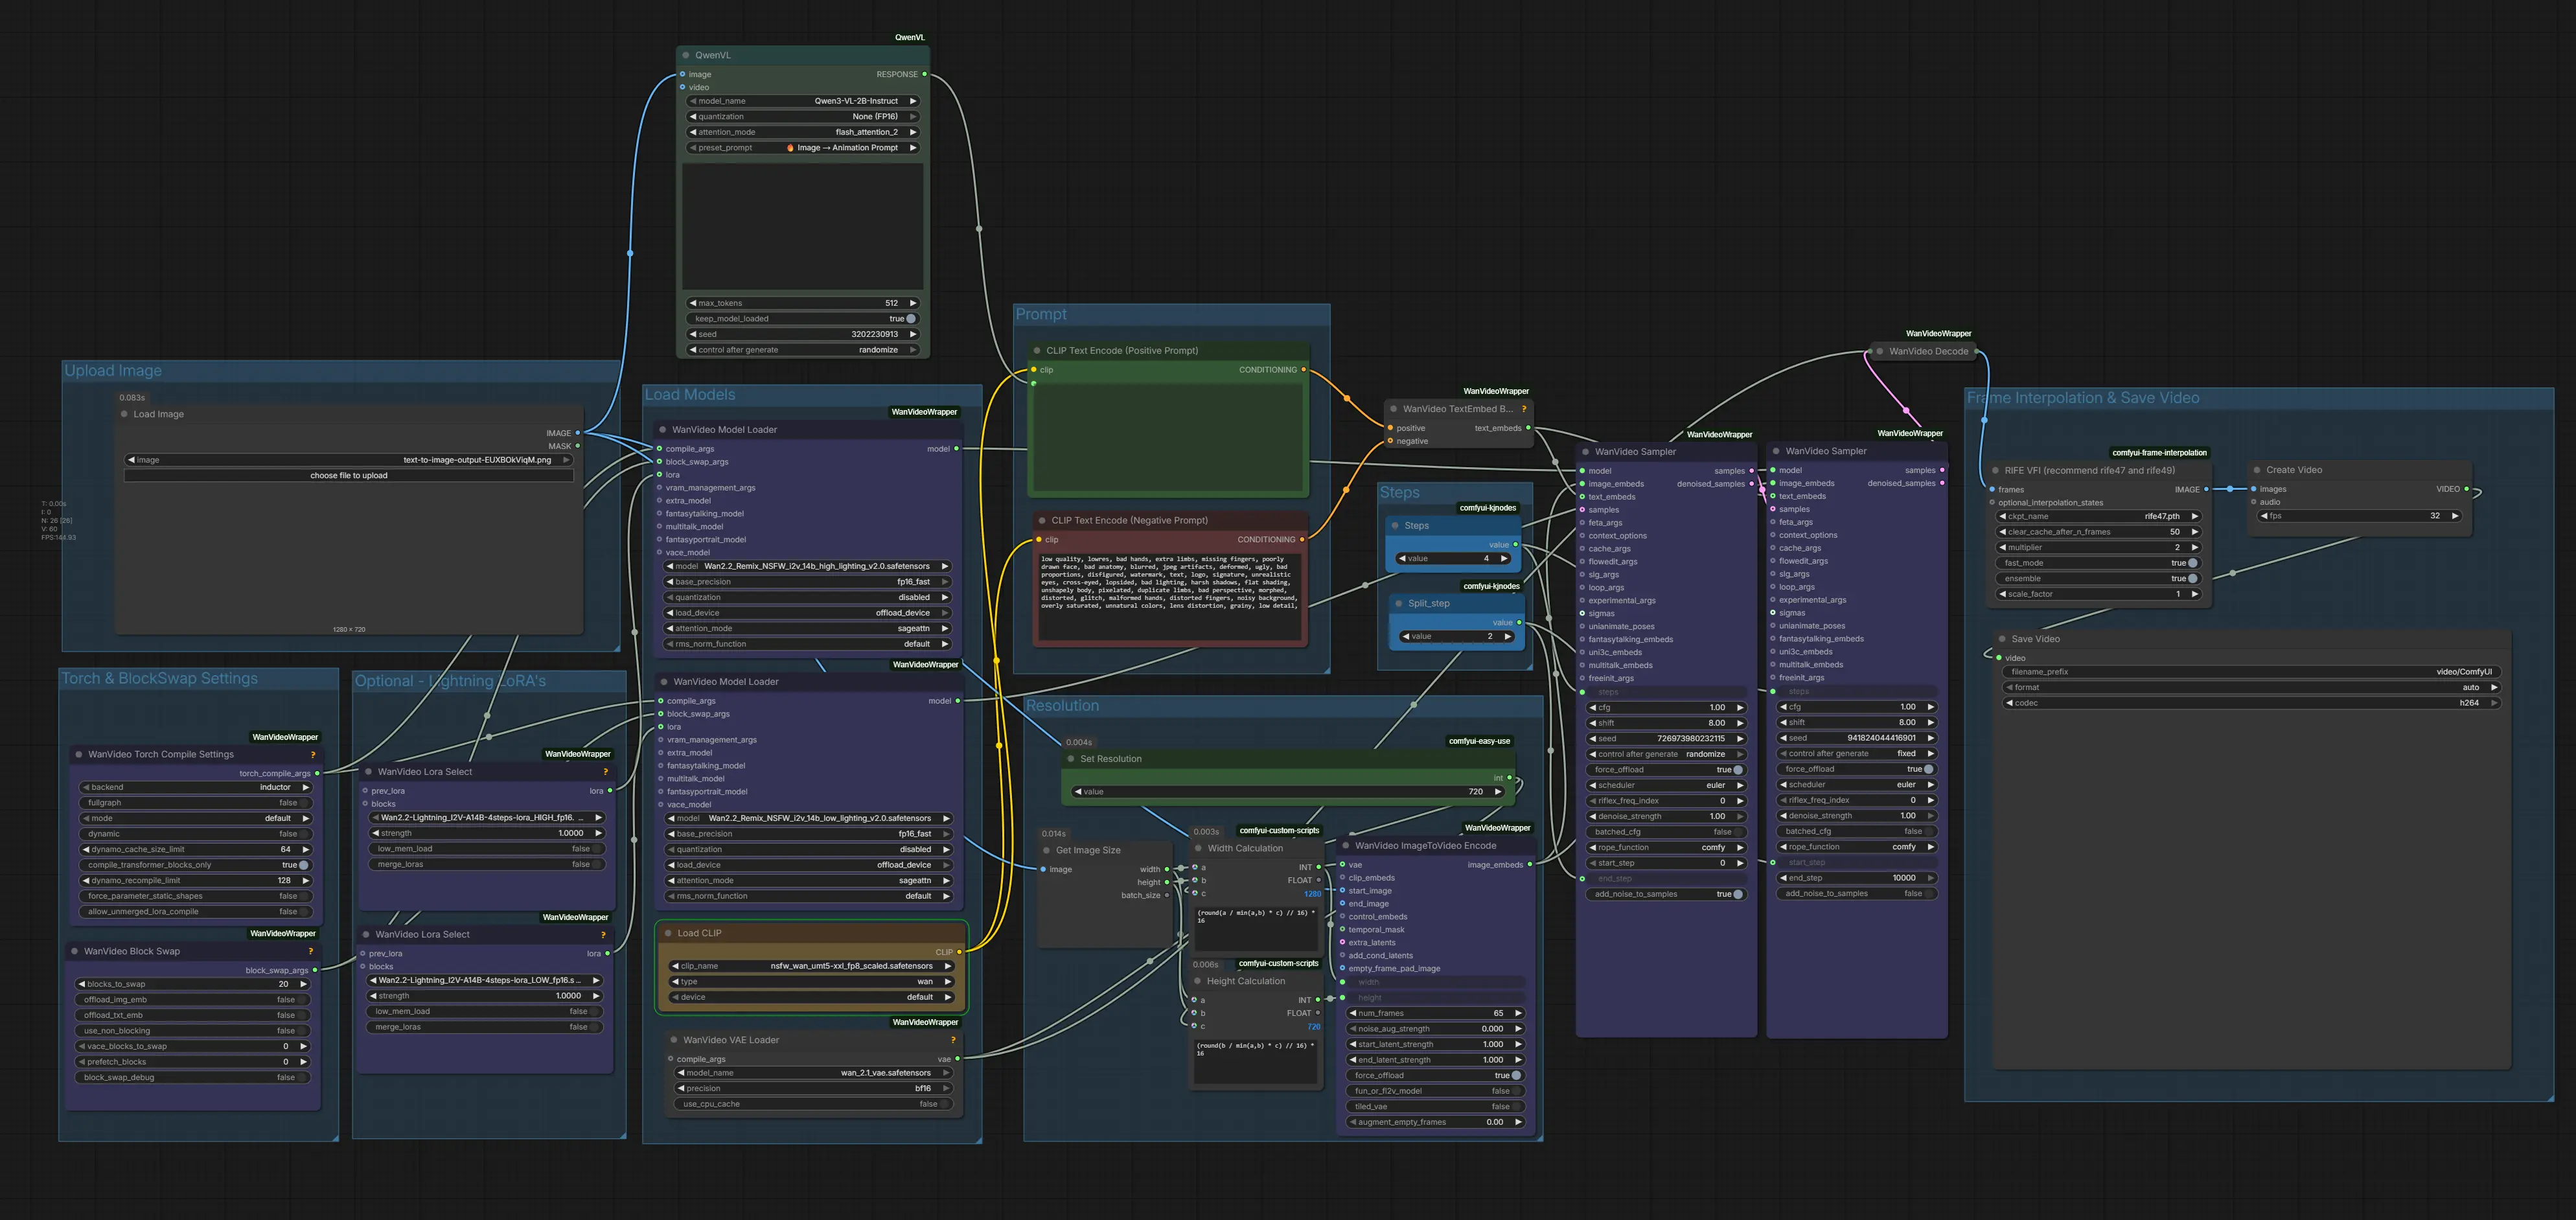
From Image to Motion: Using the Animation Prompt in WAN 2.2
Below is an example where we use this new preset to create an animation prompt and feed it into an image-to-video WAN 2.2 Remix workflow. Workflow Download: 👉WAN 2.2 Remix Qwen 3VL JSON Workflow File.
If you want to learn more about uncensored image-to-video generation and the models you’ll need, check out this article 👉 Create Uncensored Videos with WAN 2.2 Remix in ComfyUI (I2V).
9. Conclusion: Smarter Prompting with Vision AI
In conclusion, Qwen 3VL revolutionizes the way we approach prompt generation in ComfyUI by integrating advanced vision capabilities. This multimodal model not only automates the tedious task of crafting detailed prompts but also enhances the overall creative process by providing intelligent visual analysis. Whether you are analyzing product photography, extracting artistic styles from images, or studying camera movements in videos, Qwen 3VL serves as a powerful tool that bridges the gap between visual content and actionable text.
The automatic model downloading feature simplifies the setup process, allowing you to dive right into your creative projects without the hassle of manual file management. Additionally, the ability to create custom system prompts ensures that the tool can adapt to your specific needs, making it versatile for various workflows.
As vision-language models continue to evolve, integrating them into creative workflows will become increasingly essential. Qwen 3VL in ComfyUI represents a significant step towards a future where AI not only generates content but also understands and learns from it, ultimately helping you achieve better results through intelligent visual analysis. Embrace the power of vision AI and transform your creative processes today!


