How to Extend Videos with SkyReels V3 in ComfyUI

Table of Contents
1. Introduction
In this tutorial, you'll learn how to extend existing videos using SkyReels V3 in ComfyUI. This Video-to-Video (V2V) workflow takes your existing footage as a reference and generates additional frames that seamlessly continue from where your video ends — preserving motion style, visual consistency, and scene content.
Unlike simple looping or frame interpolation, SkyReels V3 uses a diffusion-based motion model conditioned on your input video. The model understands the temporal dynamics of your clip and predicts coherent future frames, producing smooth, natural-looking extensions that feel like a genuine continuation rather than an artifact.
By the end of this guide, you'll be able to take any video clip and extend it by several seconds — entirely inside ComfyUI, using Kijai's optimized FP8 model for efficient generation.
2. System Requirements for SkyReels V3 Video Extension
Before extending videos with SkyReels V3, ensure your system meets the necessary hardware and software requirements. This workflow benefits significantly from a powerful GPU with sufficient VRAM — we recommend at least an RTX 4090 (24GB VRAM) for optimal performance, or using a cloud GPU provider like RunPod.
Requirement 1: ComfyUI Installed & Updated
You'll need ComfyUI installed and running, either locally or through a cloud service. For local Windows installation, follow this comprehensive guide:
👉 How to Install ComfyUI Locally on Windows
Once installed, navigate to the Manager tab in ComfyUI and click "Update ComfyUI" to ensure you're running the latest version. Keeping ComfyUI updated is essential for compatibility with the latest models, custom nodes, and workflow features that SkyReels V3 requires.
While SkyReels V3 can run locally with adequate hardware, we strongly recommend using the Next Diffusion - ComfyUI SageAttention template on RunPod. Here's why:
-
Pre-optimized Environment — Sage Attention and Triton acceleration come pre-installed and configured, dramatically improving generation speed and VRAM efficiency.
-
Zero Setup Friction — No need to manually install CUDA libraries or PyTorch dependencies.
-
Persistent Storage — Network Volume support ensures your models, workflows, and generated content are saved between sessions, eliminating repeated downloads.
Spin up a production-ready ComfyUI instance in minutes using our RunPod template:
👉 How to Run ComfyUI on RunPod with Network Volume
Requirement 2: Download SkyReels V3 Model Files
The SkyReels V3 Video Extension Workflow relies on a specialized set of models designed for video-to-video generation. These include the core SkyReels V3 V2V diffusion model, a VAE encoder, and a text encoder for prompt guidance.
Download each of the following models and place them in their respective ComfyUI model directories exactly as specified below:
| File Name | Hugging Face Download Page | File Directory |
|---|---|---|
| Wan21-SkyReelsV3-V2V_fp8_scaled_mixed.safetensors | 🤗 Download | ..\ComfyUI\models\diffusion_models |
| umt5-xxl-enc-fp8_e4m3fn.safetensors | 🤗 Download | ..\ComfyUI\models\text_encoders |
| Wan2_1_VAE_bf16.safetensors | 🤗 Download | ..\ComfyUI\models\vae |
Once all models are downloaded and placed correctly, ComfyUI will automatically detect them on startup. This ensures the SkyReels V3 video extension nodes load properly and can process your input video seamlessly.
Requirement 3: Verify Folder Structure
Before running the SkyReels V3 workflow, confirm that all downloaded models are organized in the correct ComfyUI subdirectories. Your folder structure should look exactly like this:
ts1📁 ComfyUI/
2└── 📁 models/
3    ├── 📁 diffusion_models/
4    │   └── Wan21-SkyReelsV3-V2V_fp8_scaled_mixed.safetensors
5    ├── 📁 vae/
6    │   └── Wan2_1_VAE_bf16.safetensors
7    └── 📁 text_encoders/
8        └── umt5-xxl-enc-fp8_e4m3fn.safetensors
With everything properly installed and organized, you're ready to load the SkyReels V3 Video Extension Workflow and start generating seamlessly extended video clips.
3. Download & Load the SkyReels V3 Video Extension Workflow
Now that your environment and models are set up, it's time to load and configure the SkyReels V3 Video Extension Workflow in ComfyUI. This workflow integrates all the necessary components — the V2V diffusion model, VAE, and text encoder — into a streamlined workflow for generating coherent video continuations from your input clip.
Load the SkyReels V3 Workflow JSON File
👉 Download the SkyReels V3 Video Extension Workflow JSON file and drag it directly into your ComfyUI canvas.
This workflow comes fully pre-configured with all essential nodes, model references, and video processing components required for seamless frame continuation from your input footage.
Install Missing Nodes
If any nodes appear highlighted in red, it means certain custom nodes are missing from your ComfyUI installation.
To resolve this:
-
Open the Manager tab in ComfyUI.
-
Click Install Missing Custom Nodes.
-
After installation completes, restart ComfyUI to activate the changes.
Once all nodes load successfully without errors, you're ready to upload your video, configure your parameters, and generate your first extended clip with SkyReels V3.
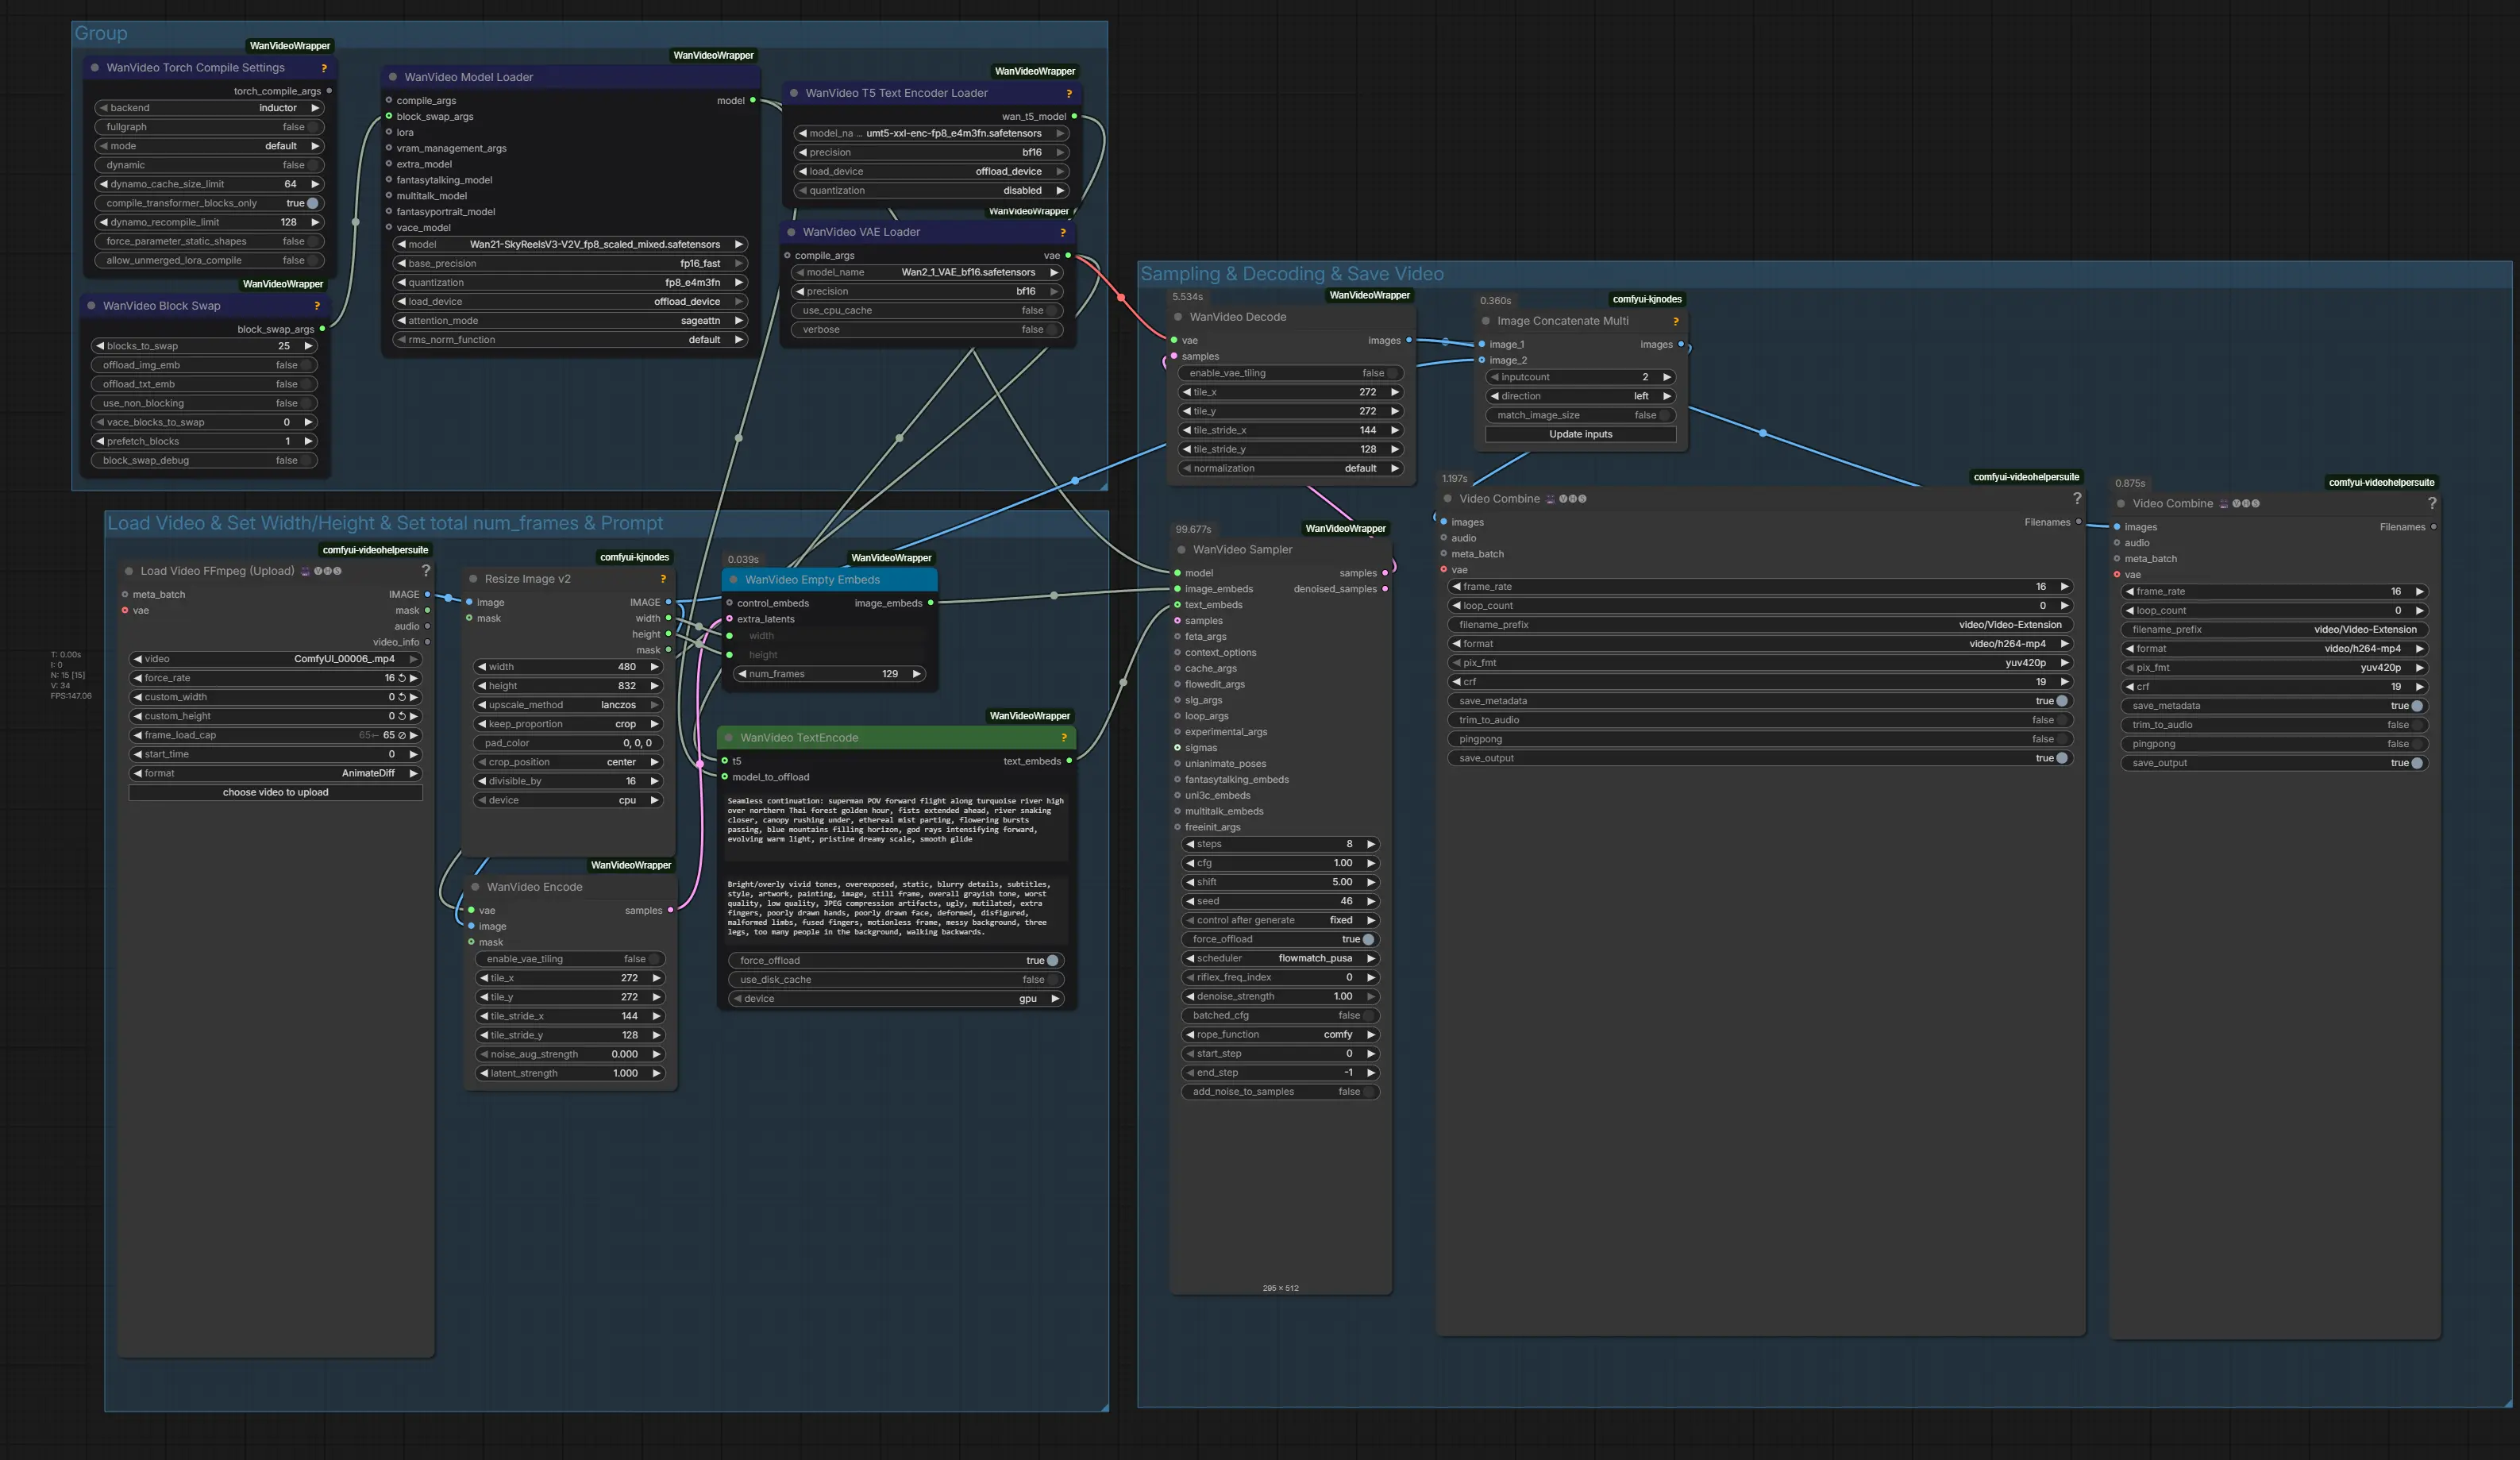
4. Running the Video Extension Workflow
With the workflow loaded and all components in place, you're ready to extend your first video. Here's a quick rundown of each setting.
Upload Your Video and Set FPS
Load your clip into the Load Video node. For this tutorial we're working with a 16 FPS clip — make sure to fill in the correct FPS both in the Load Video node and in the Video Combine node at the end of the workflow, so your output plays back at the right speed. In the Load Video node you can also adjust the frame_load_cap — we set it to 65 to load all frames from our 4-second clip. Make sure this matches the actual length of your source video. 💡
Set Video Dimensions
In the Resize / Resolution node, match your output resolution to your input video. For this tutorial we use 480×832 (9:16), ideal for social media content. Always keep the dimensions consistent with your source clip to ensure a seamless transition.
Set Number of Frames (Total Output Length)
In the WanVideo Empty Embeds node, enter the total output duration in frames (num_frames) — not the number of new frames to add. SkyReels V3 uses your input as context and generates frames up to this total. Calculate it as: desired output seconds × FPS + 1.
Example: A 4-second source clip (65 frames) extended to 8 seconds → 8 × 16 + 1 = 129 num_frames.
| Source Clip | Desired Output | Num Frames (at 16 FPS) |
|---|---|---|
| 4 sec (65 frames) | 6 seconds | 97 |
| 4 sec (65 frames) | 8 seconds | 129 |
| 4 sec (65 frames) | 10 seconds | 161 |
Configure Your Text Prompt
The prompt guides how the motion continues — think of it as describing exactly what happens next in the scene. Focus on motion, camera movement, and atmosphere rather than introducing new subjects. The goal is a seamless continuation of what's already happening.
Example prompt:
"Seamless continuation: superman POV forward flight along turquoise river high over northern Thai forest golden hour, fists extended ahead, river snaking closer, canopy rushing under, ethereal mist parting, flowering bursts passing, blue mountains filling horizon, god rays intensifying forward, evolving warm light, pristine dreamy scale, smooth glide."
Run the Generation
Once everything is configured, click Run Prompt. SkyReels V3 will analyze your input frames, apply the prompt-guided motion continuation, and output a complete extended video.
🔥 For faster generation we recommend using RunPod with GPU rental.
5. Conclusion
Congratulations! You've now mastered the complete workflow for extending videos with SkyReels V3 in ComfyUI. You've learned how to:
-
Set up your environment and install the necessary V2V models
-
Load and configure the SkyReels V3 Video Extension workflow
-
Upload your source video and configure FPS, resolution, and frame count
-
Use text prompts to guide the style of your video continuation
-
Generate seamless, temporally consistent video extensions
SkyReels V3's V2V pipeline is a powerful tool for content creators, filmmakers, and AI artists looking to breathe more life into their footage — whether you're padding a short clip, generating B-roll continuations, or exploring creative extensions of AI-generated video. The combination of reference video conditioning and prompt-based control gives you precise creative direction over how your footage continues.
Now it's your turn to experiment. Try different source videos, play with frame counts, and craft prompts that guide the extension toward the look and feel you're after. With SkyReels V3 and ComfyUI, seamless video extension is just a queue away.


