Consistent Z-Image-Turbo Images with ControlNet in ComfyUI (T2I)

Table of Contents
1. Introduction
Creating consistent and high-quality images using AI can be challenging, especially when aiming for precision in structure and control. In this tutorial, we will explore how to generate Z-Image Turbo Images, a high-performance model from Alibaba, in ComfyUI using ControlNet. This guide is designed for users who want to enhance their text-to-image (T2I) workflow, focusing on achieving stable, clean, and repeatable results. We’ll cover the ideal node setups, workflow configurations, and optimization tips to improve accuracy and reliability. By the end of this tutorial, you’ll have a complete understanding of how to leverage ControlNet in ComfyUI to create stunning images with Alibaba’s Z-Image Turbo model for precise control.
2. System Requirements for Z-Image-Turbo and Controlnet Workflow (T2I
Make sure your system meets the hardware and software requirements to run Z‑Image Turbo in ComfyUI. This model is optimized for efficiency and can generate high-quality uncensored AI images.
Today, we’ll be testing this workflow on an RTX 4090, which is recommended for optimal and fast results. If you don’t have access to a high-end GPU, RunPod is a great cloud GPU option that lets you achieve similar performance. This makes it easy to run Z‑Image Turbo efficiently, even if you don’t have access to a high-end local GPU.
Requirement 1: ComfyUI Installed
You’ll need ComfyUI installed either locally or on a cloud GPU service.
Local Windows installation: Follow this guide:
👉 How to Install ComfyUI Locally on Windows
Cloud GPU (RunPod recommended):
If your local GPU is limited, you can run ComfyUI in the cloud using a persistent network volume. RunPod provides easy access to high-end GPUs like the RTX 4090. Step-by-step instructions:
👉 How to Run ComfyUI on RunPod with Network Volume
Requirement 2: Update ComfyUI
Keeping ComfyUI updated ensures full compatibility with the latest workflows, nodes, and features.
For Windows Portable Users:
-
Open the folder: ...\ComfyUI_windows_portable\update
-
Double-click update_comfyui.bat
For RunPod Users:
ts1 cd /workspace/ComfyUI && git pull origin master && pip install -r requirements.txt && cd /workspace
and/or run to update ComfyUI
ts1/workspace/venv/bin/python3 -m pip install -r /workspace/ComfyUI/requirements.txt
Requirement 3: Download Models for Z‑Image Turbo & Controlnet
Download the following model files and place them in the correct directories inside ComfyUI:
| File Name | Hugging Face Download Page | File Directory | Notes |
|---|---|---|---|
| qwen_3_4b.safetensors | 🤗 Download | ../ComfyUI/models/text_encoders | Required |
| z_image_turbo_bf16.safetensors | 🤗 Download | ../ComfyUI/models/diffusion_models | Required |
| ae.safetensors | 🤗 Download | ../ComfyUI/models/vae | Required |
| Z-Image-Turbo-Fun-Controlnet-Union.safetensors | 🤗 Download | ../ComfyUI/models/model_patches | New ControlNet-enabled model |
Verify Folder Structure
Confirm that your folders and files are organized like this:
ts1📁 ComfyUI/
2└── 📁 models/
3     ├── 📁 diffusion_models/
4     │     └── z_image_turbo_bf16.safetensors
5     ├── 📁 text_encoders/
6     │     └── qwen_3_4b.safetensors
7     ├── 📁 vae/
8     │     └── ae.safetensors
9     └── 📁 model_patches/
10           └── Z-Image-Turbo-Fun-Controlnet-Union.safetensors
Once all files are properly placed and organized, your environment is ready. With a 24 GB VRAM GPU like the RTX 4090—or via RunPod cloud GPU—you can generate uncensored AI images at high resolutions with optimal performance and Control.
3. Download & Load the Z-Image Turbo & ControlNet Workflow
Now that your system and models are ready, it’s time to load the Z‑Image Turbo workflow into ComfyUI. This workflow contains all the necessary nodes, configurations, and settings to run Z‑Image Turbo efficiently while giving you full control over poses, structure, and image composition for high-quality, uncensored T2I generation.
Step 1: Download the Workflow File
Start by downloading the workflow JSON file designed specifically for Z‑Image Turbo and ControlNet. It includes all nodes, samplers, and model references pre-configured for smooth operation.
👉 Download Z‑Image Turbo & ControlNet (DWPose) ComfyUI Workflow JSON
Step 2: Load the Workflow in ComfyUI
Once downloaded:
-
Launch ComfyUI.
-
Drag and drop the JSON workflow file onto the canvas.

The workflow will automatically populate all required nodes, samplers, ControlNet nodes, and output nodes. You’re now ready to start generating consistent, high-quality T2I images.
4. Running the Z-Image Turbo ControlNet Text-to-Image Workflow
Now that your workflow is loaded, let’s run your first Z‑Image Turbo image generation. This workflow is simple, including ControlNet for controlled outputs.
For this example, we’ll use the DWPose estimator to guide poses in your final images. Later in the guide, we’ll provide extra workflows showing how to swap the DWPose node for other ControlNet preprocessors, such as DepthMap or Canny, for controlling structure, edges, or depth instead of poses.
| Step | Action | Notes |
|---|---|---|
| 1 | Load Models | Ensure the following models are loaded in the workflow nodes: • z_image_turbo_bf16.safetensors (Diffusion Model)• qwen_3_4b.safetensors (Text Encoder)• ae.safetensors (VAE)• Z-Image-Turbo-Fun-Controlnet-Union.safetensors (ControlNet Patch) |
| 2 | Input Reference Image for ControlNet | Drag and drop your reference image into the ControlNet image node (LoadImage → DWPreprocessor → QwenImageDiffsynthControlnet). This will guide poses, structure, or layout. |
| 3 | Set Prompt | Enter your desired text prompt in the CLIPTextEncode node. The workflow is pre-configured for fast and consistent generation, so you don’t need to adjust extra nodes. |
| 4 | Check Settings | Pre-configured in the workflow: • Steps: 9 (fast, high-quality) |
| 5 | Generate Image | Run the workflow. The output will be previewed in the PreviewImage node and saved automatically by the SaveImage node. |
💡 Tip: All nodes are already connected and optimized in the downloaded workflow. You only need to load models, add a reference image for ControlNet, and input your prompt to start generating controlled, high-quality T2I images.
5. Alternative Z‑Image Turbo ControlNet Workflows: DepthMap & Canny
In addition to DWPose, you can swap the ControlNet node (DWPose Estimator) for Depth Anything or Canny to guide structure, edges, or depth in your images. These alternative workflows let you create different controlled outputs while using the same Z‑Image Turbo setup.
Z-Image-Tubro & Depth Anything ControlNet Workflow
Swap the DWPose node with a Depth Anything Node to guide your images based on depth information, perfect for structured or layered compositions.
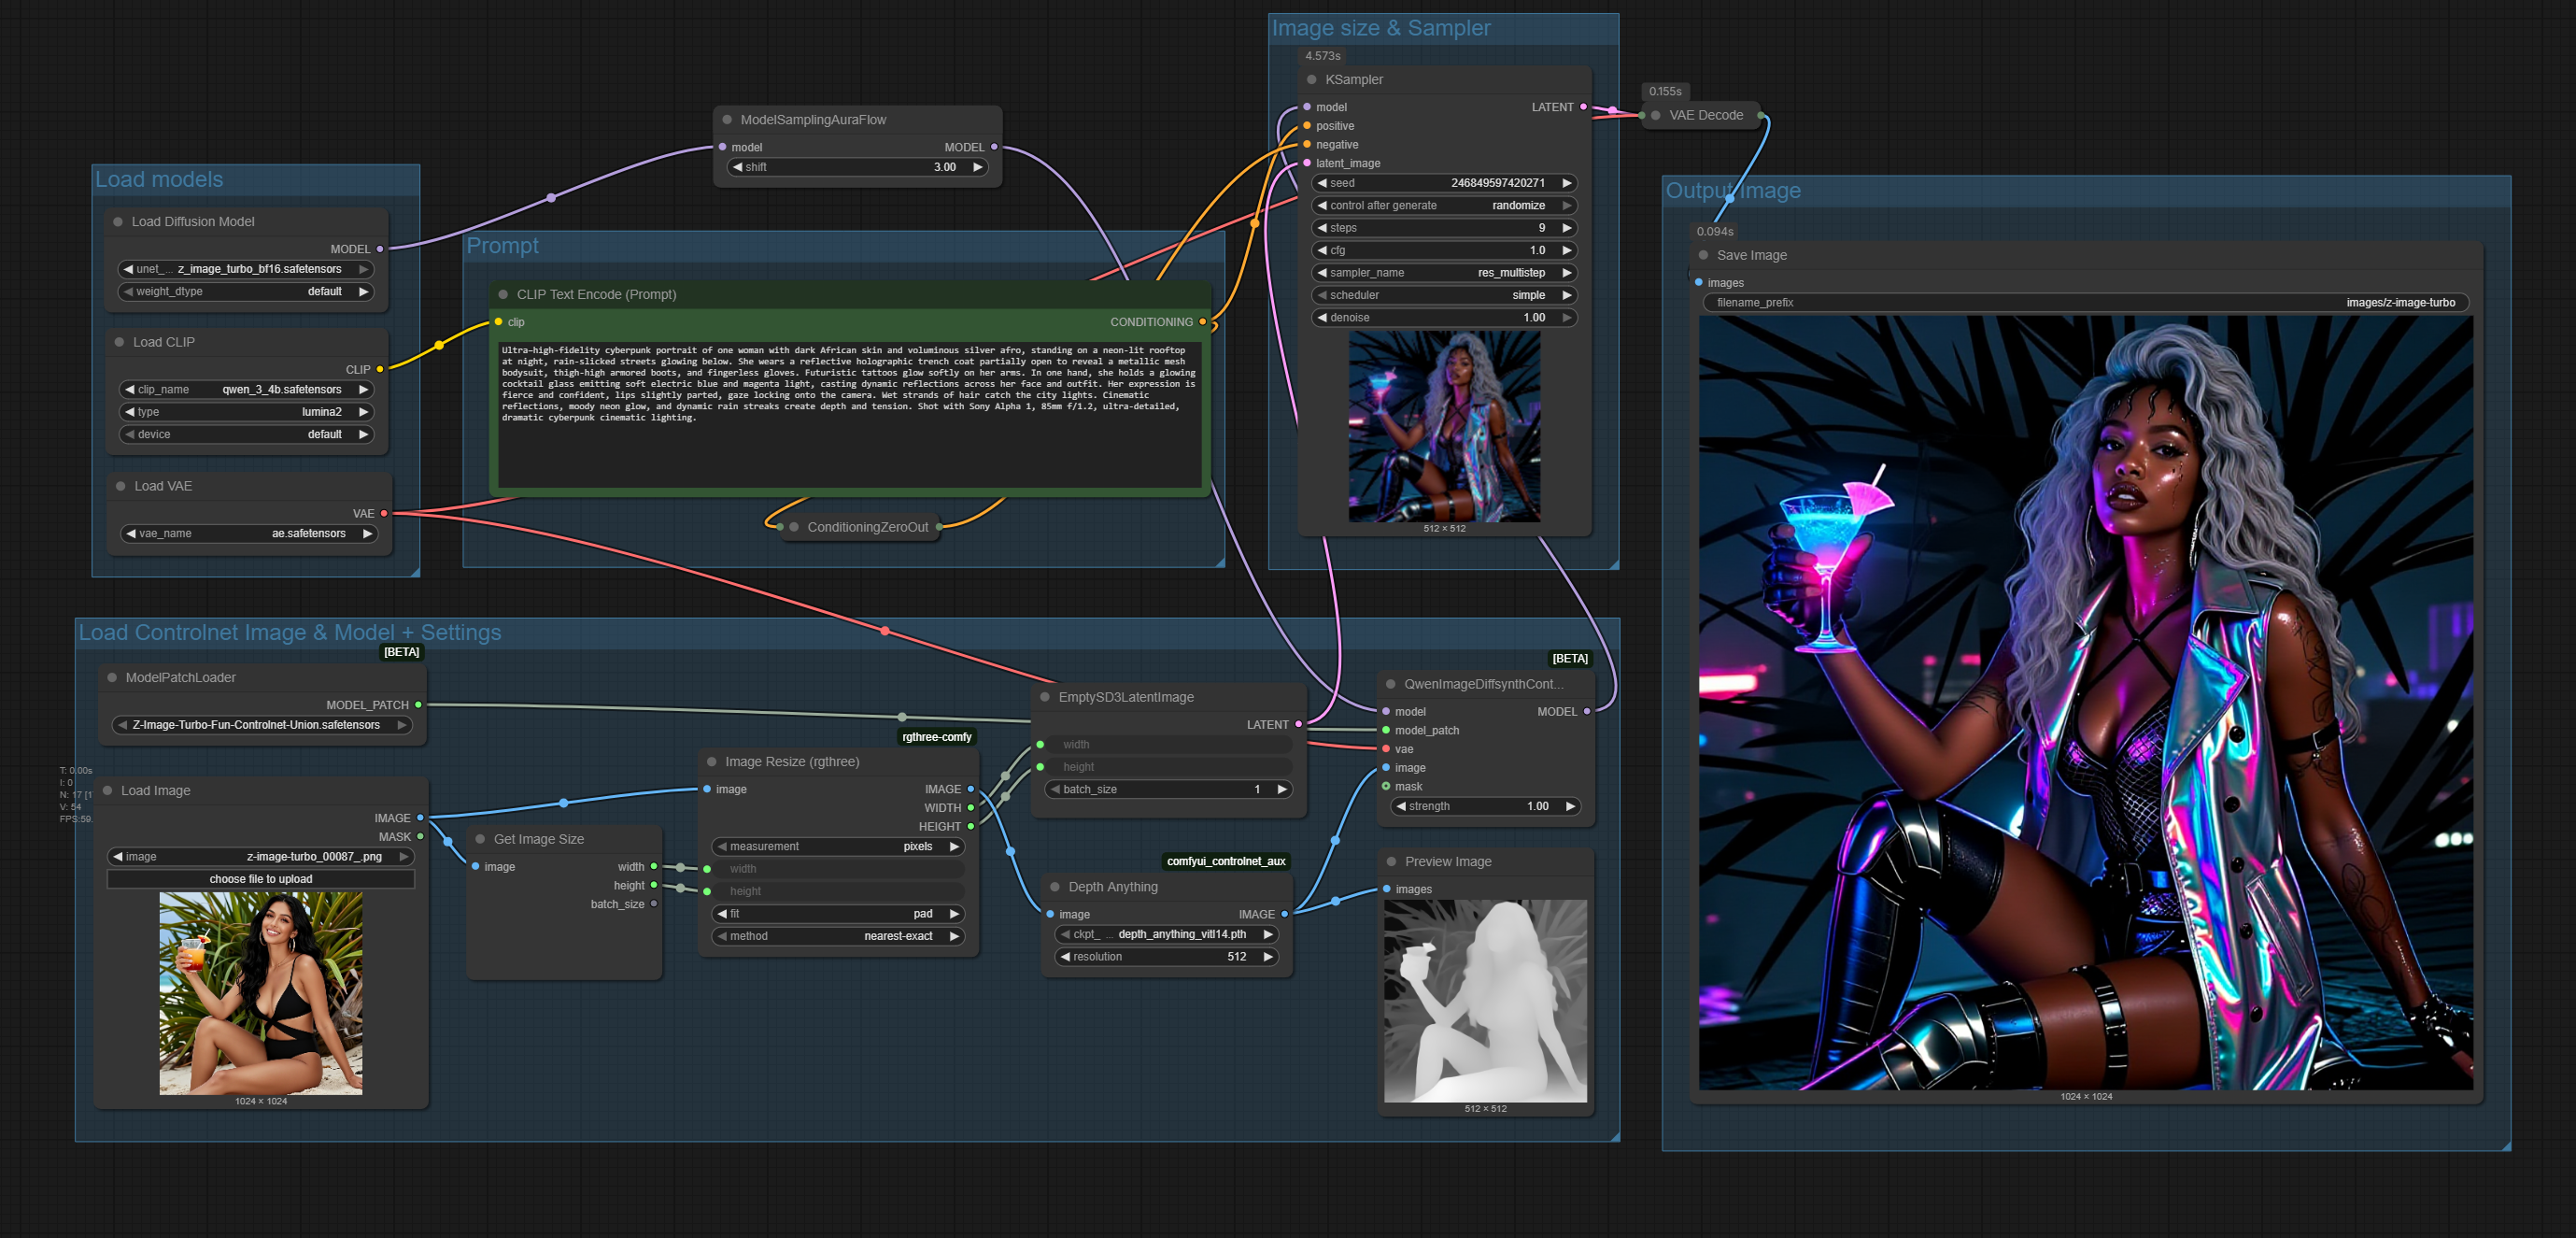 👉 Download Z‑Image Turbo ControlNet (Depth Anything) Workflow JSON
Z-Image-Tubro & Canny Edge ControlNet Workflow
Replace the DWPose node with a Canny edge ControlNet to control images using edge detection, ideal for precise outlines or line-based guidance.
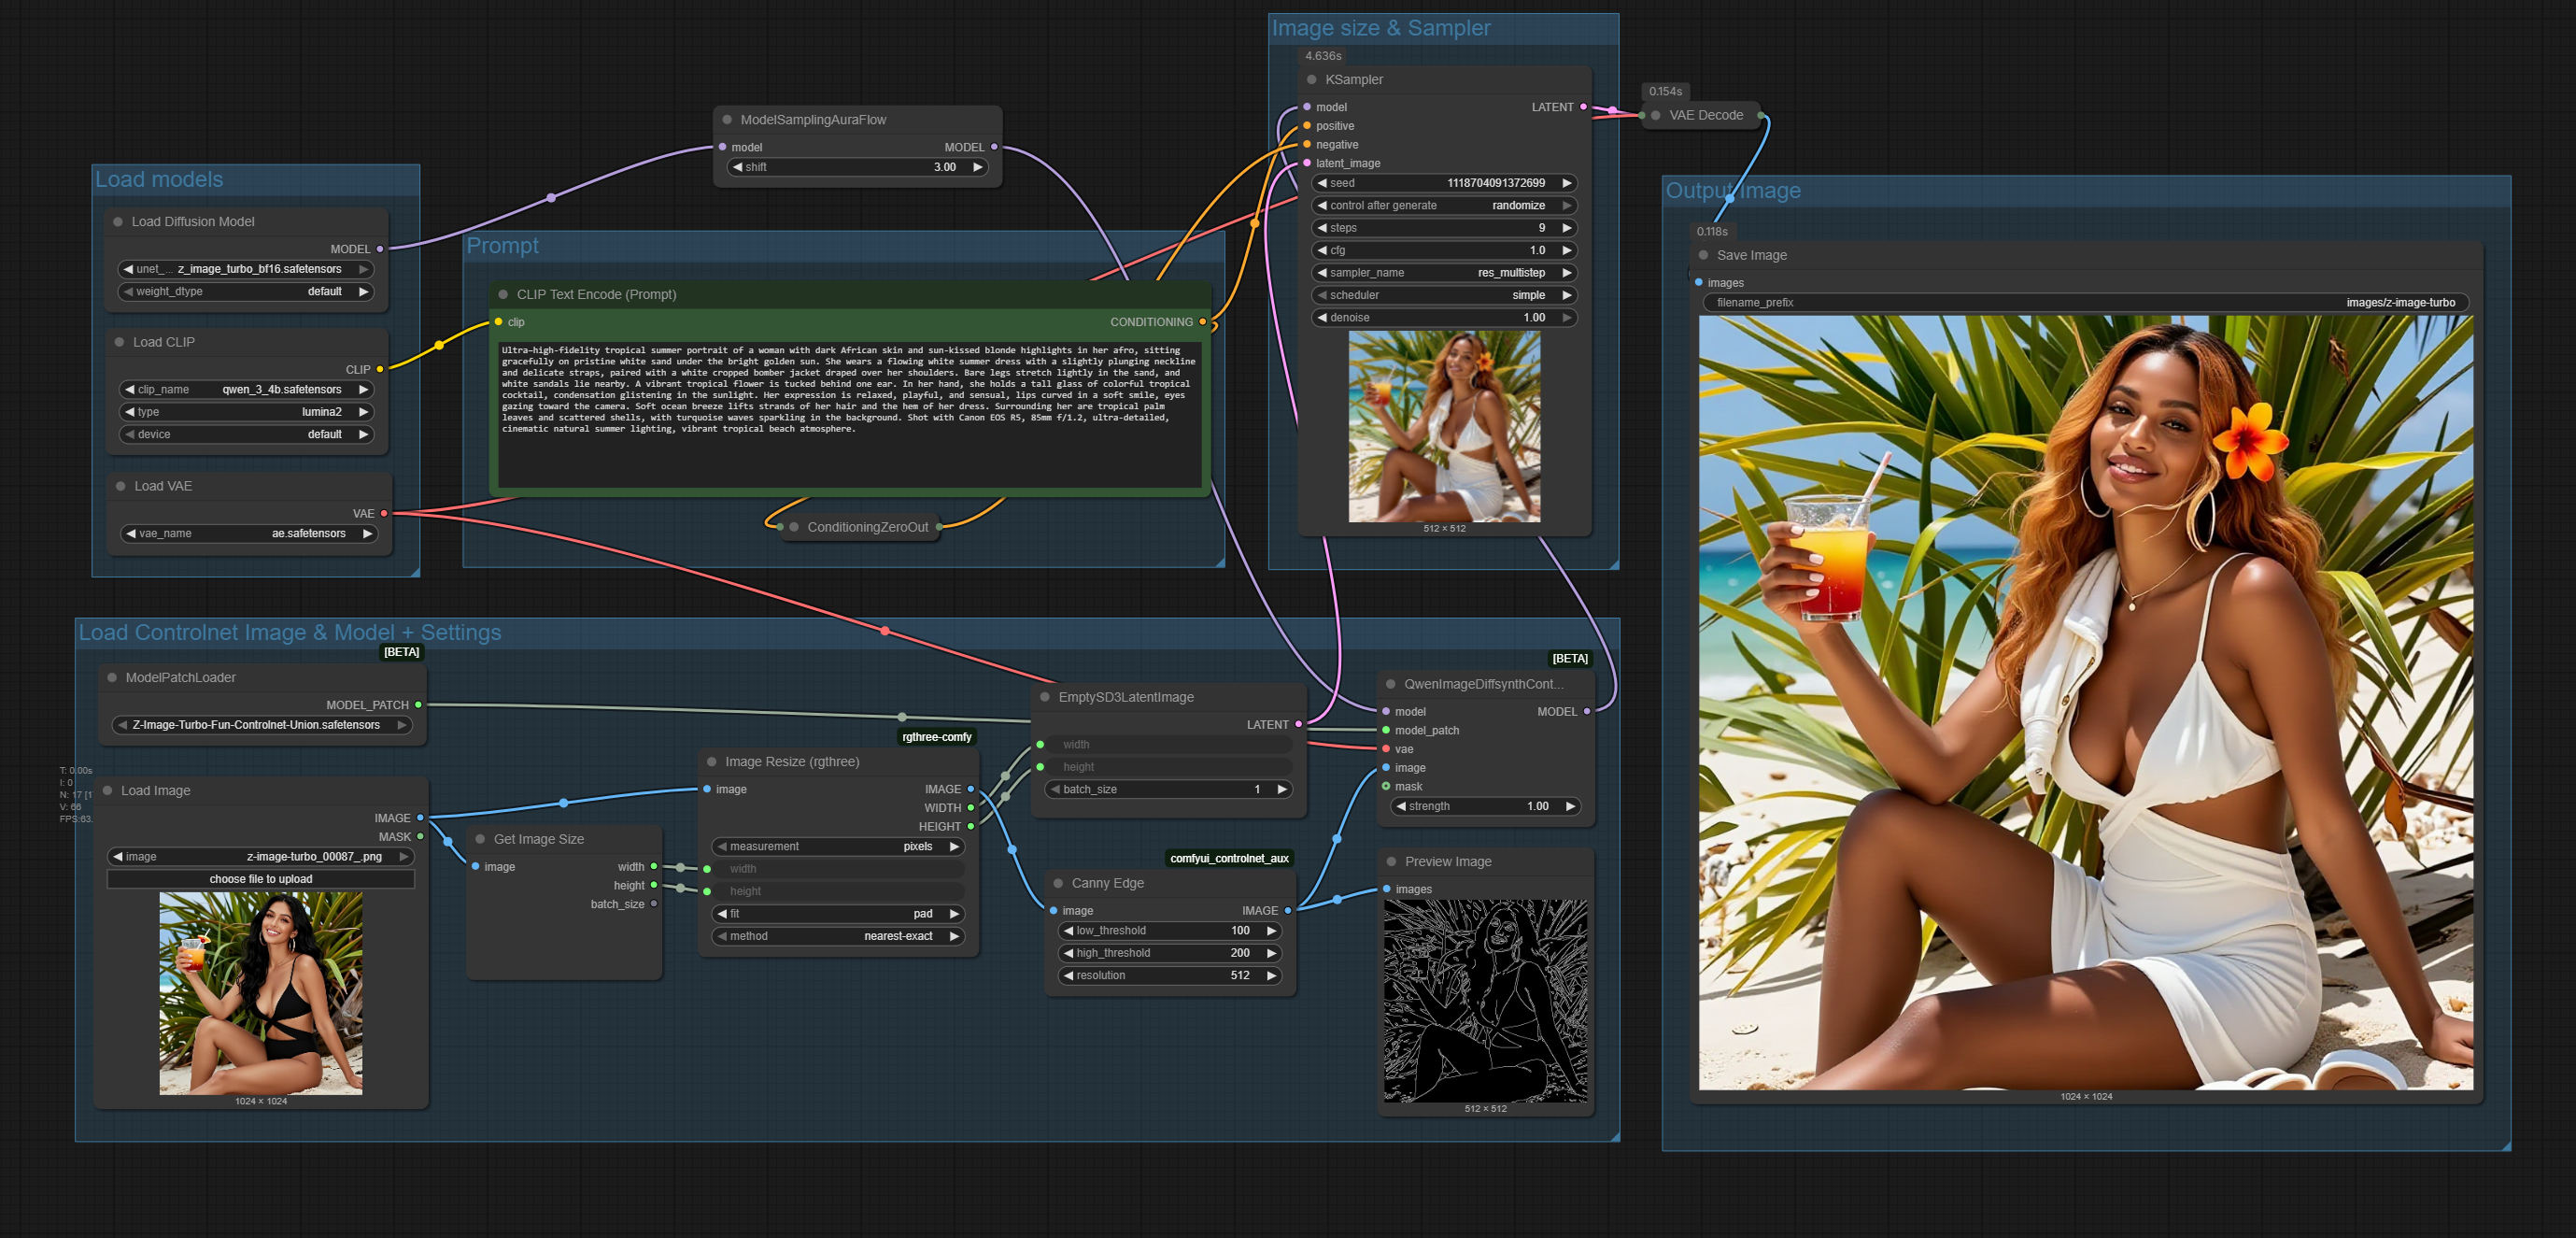 👉 Download Z‑Image Turbo ControlNet (Canny) Workflow JSON
By following the pre-configured workflows, loading the models, and adding reference images, you can achieve consistent, fast, and repeatable results without needing complex setup. These workflows are designed to make advanced ControlNet image generation accessible, whether you’re using a local RTX 4090 or a cloud GPU like RunPod.
6. Conclusion
We’ve shown how to create consistent, high-quality Z‑Image Turbo images in ComfyUI using ControlNet. With DWPose for controlled poses and alternatives like DepthMap or Canny for structure and edges, this workflow makes T2I generation fast, precise, and repeatable.
On an RTX 4090, each generation took around 5 seconds, though times may vary depending on the resolution of your input image, since the workflow uses the control image as both the guide and the latent image for the final result.
Hopefully, you enjoyed this tutorial and can start creating consistent, stunning outputs with the new Z‑Image Turbo model and ControlNet.
If you found this tutorial helpful, feel free to share our guides, subscribe to our YouTube channel, or give our service a try. Your kindness helps us create more content for the AI and creative community!

Thank you for following our guides! Happy creating, and we’ll see you in the next one!


