Multi-Angle Image Generation with Qwen Image Edit in ComfyUI

Table of Contents
- 1. Introduction
- 2. Requirements for Running Qwen Image Multi-Angle
- 3. Load the Qwen Image Edit Multi-Angle FP8 Workflow for ComfyUI
- 4. Running Your First Qwen Image Edit Multi-Angle Workflow
- 5. BONUS: Qwen Image Edit Multi-Angle GGUF Workflow
- 6. EXTRA: Run Qwen Image Edit Multi-Angle on Next Diffusion
- 7. Conclusion
1. Introduction
In this tutorial, you’ll learn how to use the Qwen Image Edit model together with Qwen Multi-Angle LoRA in ComfyUI to change the perspective of any image. Simply input your image, provide a prompt describing the new camera angle, and let the AI generate the result. This workflow preserves key details such as character appearance, lighting, and overall style, making it ideal for visual storytelling and creating datasets for training custom LoRAs.
2. Requirements for Running Qwen Image Multi-Angle
Before starting, make sure your system meets the hardware and software requirements to run the Qwen Image Edit Multi-Angle FP8 workflow smoothly. This setup still requires a solid GPU — we recommend at least an RTX 4090 (24GB VRAM) or using a cloud GPU service like RunPod.
Later in this tutorial, we’ll provide a GGUF workflow suitable for lower VRAM systems, so you can also use Qwen-Image-Edit-Multi-Angle without a high-end GPU.
Requirement 1: Install ComfyUI
To get started, you need ComfyUI installed locally or via cloud. For local Windows setup, follow this guide:
👉 How to Install ComfyUI Locally on Windows
Once installed, make sure to update ComfyUI to the latest version by opening the Manager tab and clicking Update ComfyUI. Keeping it up to date ensures compatibility with the latest workflows and features.
If you don’t have a high-end GPU locally, consider running ComfyUI on RunPod with a network volume for persistent storage:
👉 How to Run ComfyUI on RunPod with Network Volume
Requirement 2: Update ComfyUI
To ensure full compatibility with the Qwen-Image-Edit-Multi-Angle workflow, make sure your ComfyUI installation is up to date.
For Windows Portable Users (Local):
-
Open the folder: ...\ComfyUI_windows_portable\update
-
Double-click update_comfyui.bat
For RunPod Users:
ts1 cd /workspace/ComfyUI && git pull origin master && pip install -r requirements.txt && cd /workspace
Keeping ComfyUI updated guarantees you have the latest features, bug fixes, and node compatibility.
Requirement 3: Download Qwen Image Edit Multi-Angle FP8 Model Files
Download the following models and LoRAs, and place them in the correct ComfyUI folders:
| File Name | Hugging Face Download | Directory |
|---|---|---|
| qwen_image_edit_2509_fp8_e4m3fn.safetensors | 🤗 Download | ..\ComfyUI\models\diffusion_models |
| Qwen-Image-Edit-Lightning-4steps-V1.0.safetensors | 🤗 Download | ..\ComfyUI\models\loras |
| Qwen-Image-Edit-Multi-Angle.safetensors | 🤗 Download | ..\ComfyUI\models\loras |
| qwen_image_vae.safetensors | 🤗 Download | ..\ComfyUI\models\vae |
| qwen_2.5_vl_7b_fp8_scaled.safetensors | 🤗 Download | ..\ComfyUI\models\text_encoders |
✨ Note: The original download for the Multi-Angle LoRA has a Chinese filename. We have renamed it to Qwen-Image-Edit-Multi-Angle.safetensors for clarity and consistency.
Requirement 4: Verify Folder Structure
After downloading and organizing all files, make sure your ComfyUI folders look like this:
ts1📂 ComfyUI/
2├── 📂 models/
3│   ├── 📂 diffusion_models/
4│   │   └── qwen_image_edit_2509_fp8_e4m3fn.safetensors
5│   ├── 📂 loras/
6│   │   ├── Qwen-Image-Edit-Lightning-4steps-V1.0.safetensors
7│   │   └── Qwen-Image-Edit-Multi-Angle.safetensors (renamed)
8│   ├── 📂 vae/
9│   │   └── qwen_image_vae.safetensors
10│   └── 📂 text_encoders/
11│       └── qwen_2.5_vl_7b_fp8_scaled.safetensors
Once your folders are organized this way, you’re ready to download and load the Qwen Image Edit Multi-Angle FP8 workflow and start generating new perspectives efficiently. Thanks to the Multi-Angle LoRA, edits can be applied quickly while maintaining high-quality results.
3. Load the Qwen Image Edit Multi-Angle FP8 Workflow for ComfyUI
Now that your system is set up, it’s time to load the Qwen Image Edit Multi-Angle FP8 workflow into ComfyUI. This step is crucial as it contains all the necessary nodes and configurations for the tool to function properly. Let’s break it down into simple steps:
Step 1: Download the Workflow File
Begin by downloading the workflow file specifically designed for the Qwen-Image-Edit-Multi-Angle workflow. This JSON file contains all the necessary nodes, configurations, and settings required for the workflow to function properly.
👉 Download Qwen-Image-Edit-Multi-Angle FP8 Workflow JSON
Step 2: Load the Workflow in ComfyUI
Once the workflow file is downloaded:
-
Launch ComfyUI.
-
Drag and drop the JSON file onto the canvas to load the full setup.
-
The workflow will populate all nodes required to run the Qwen-Image-Edit-Multi-Angle workflow.
💡 Reminder:
-
If you see any red nodes, this means some custom nodes are missing.
-
To fix this:
-
Open the Manager tab in ComfyUI.
-
Click Install Missing Custom Nodes and install all missing nodes.
-
After installation, restart ComfyUI.
-
Following these steps ensures the workflow runs smoothly and all nodes function correctly.
Troubleshooting
If you notice any red nodes appearing after loading the workflow, don’t panic! This usually indicates that some custom nodes are missing. To fix this, navigate to the Manager tab, select Install Missing Custom Nodes, and then restart ComfyUI. This should resolve any issues and get you ready for the next step.
With the workflow successfully loaded, you’re now prepared to run your first angle edit!
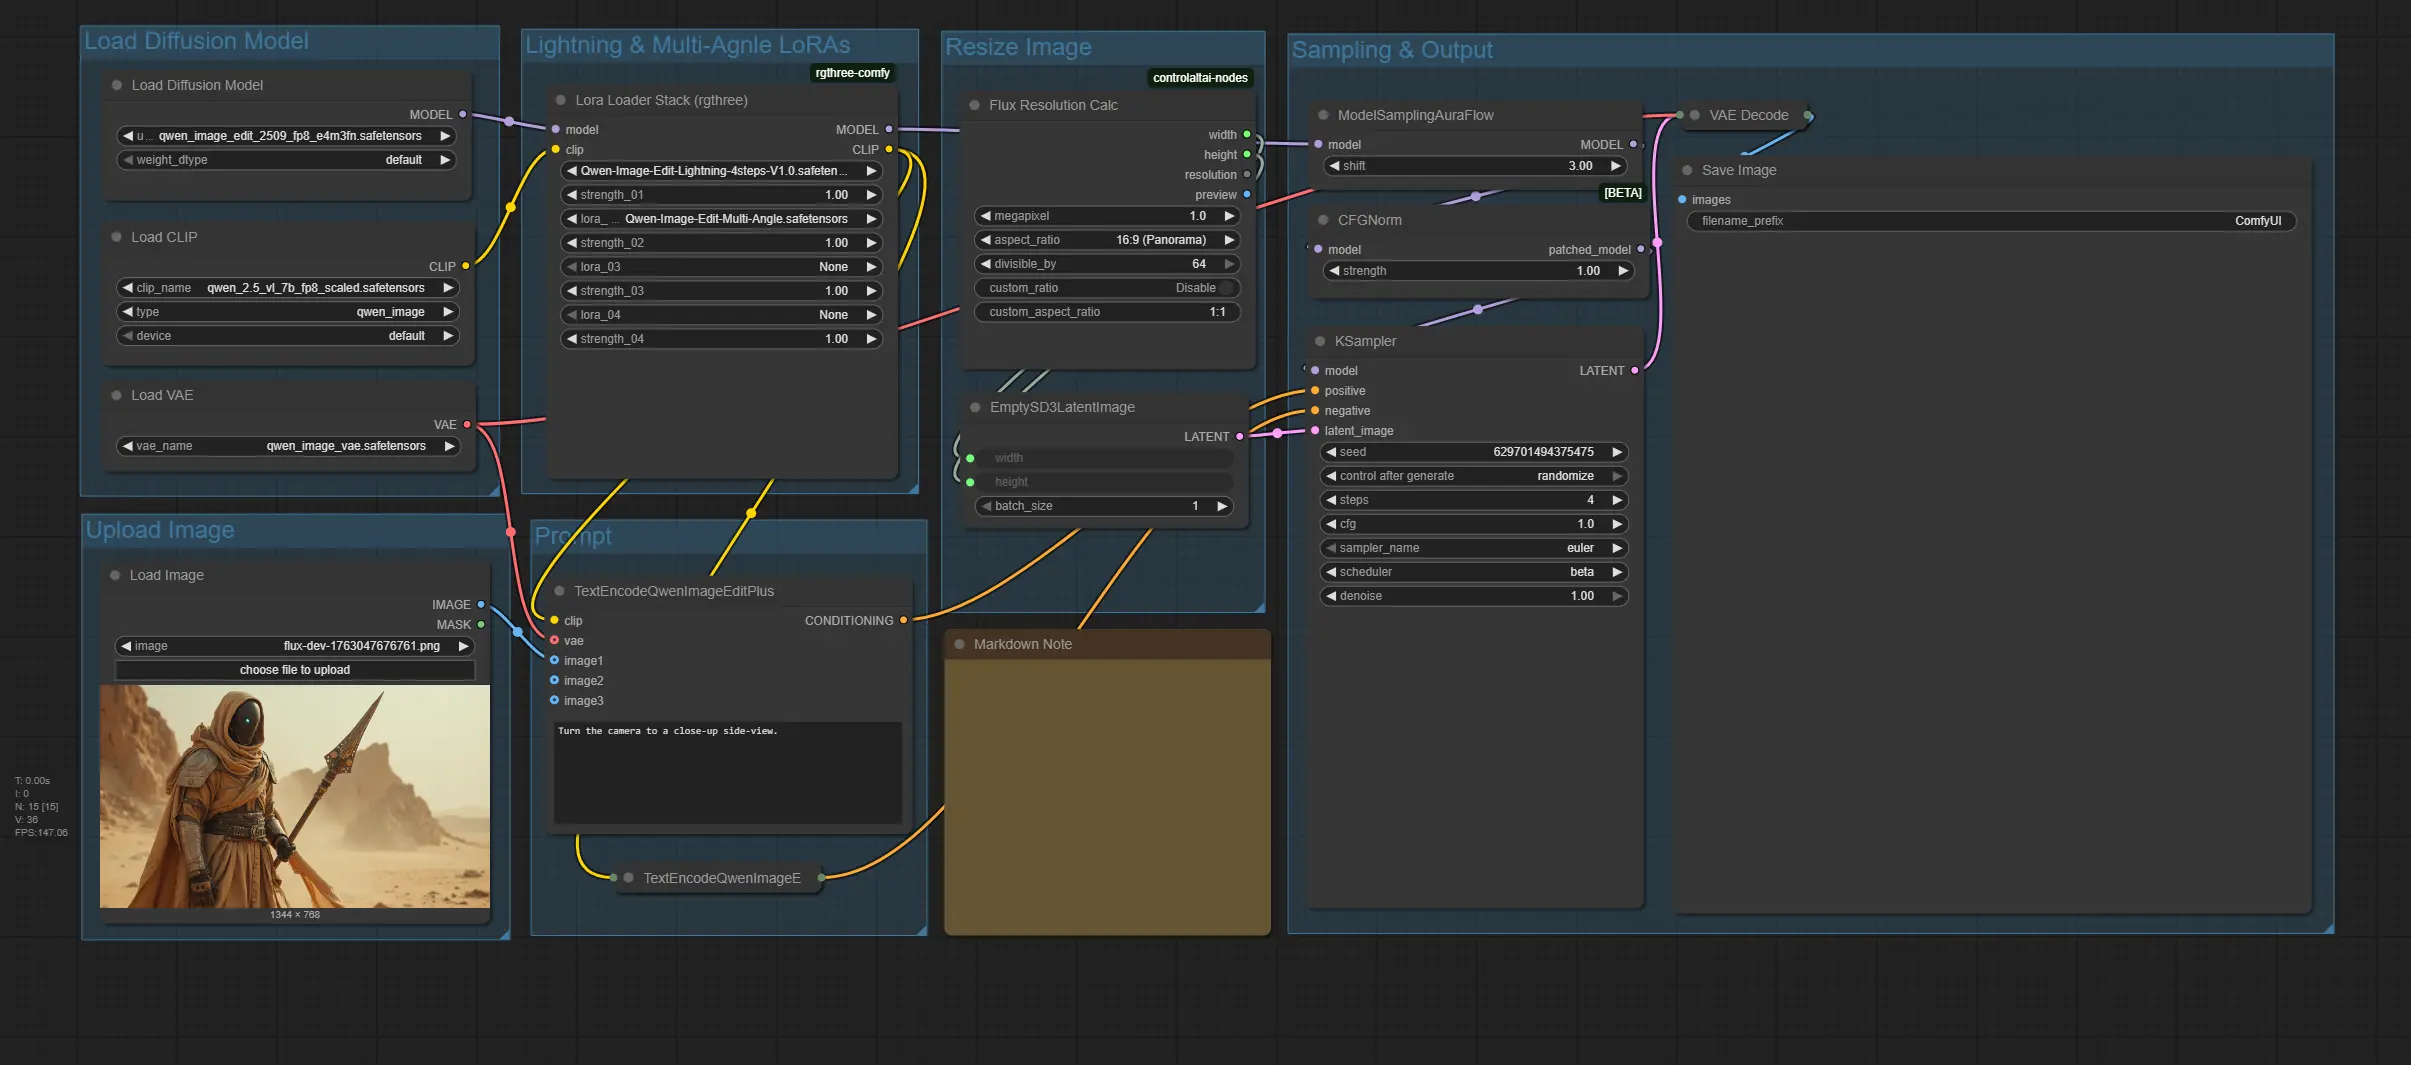
4. Running Your First Qwen Image Edit Multi-Angle Workflow
Now that the workflow is ready, let’s perform your first angle edit using the Qwen-Image-Edit-Multi-Angle workflow. We’ll start with a sample image and walk through the basic steps to apply perspective changes quickly and easily.
Step 1: Load the Image
Upload the image you want to change the perspective of. Here, we start with a 16:9 aspect ratio.

Step 2: Add a Prompt
Next, write a prompt describing the new camera angle. Decide what elements of the image you want to change (the camera angle or any other elements). We advise starting with just the new camera angle in your prompt. Once you see the result, you can extend the prompt to specify additional changes, such as hairstyle, outfit, or background adjustments—after all, this is still the Qwen Image Edit model, so it can handle more detailed edits on top of the perspective change.
Here’s a list of camera movement and angle options you can use in your prompts:
-
Move the camera forward
-
Move the camera backward
-
Move the camera left
-
Move the camera right
-
Move the camera up
-
Move the camera down
-
Rotate the camera 45 degrees to the left
-
Rotate the camera 45 degrees to the right
-
Turn the camera to a top-down view
-
Turn the camera to a wide-angle lens
-
Turn the camera to a close-up
💡 These are just some of the possibilities—you can mix and match movements, rotations, and perspectives to achieve the exact angle you want.
Step 3: Adjust Image Dimensions
If needed, you can adjust the image resolution or ratio using the Flux Resolution Calc node.
-
We recommend keeping the same ratio as the original image—in this case, 16:9.
-
You can experiment with different ratios by modifying the settings in the Flux Resolution Calc node to see how the output changes.
This allows you to maintain proportions or try creative framing while keeping the workflow flexible.
Step 4: Adjust Workflow Settings
Now, it’s time to tweak the main workflow settings. Most users don’t need to change anything here, but these are the recommended values:
-
Steps: 4–8
-
CFG: 1
-
Sampler: Euler
-
Scheduler: Beta
These settings are optimized for fast, high-quality edits while using the Lightning LoRA.
Step 5: Run the Workflow
Finally, click the Run button to execute the workflow. After a moment, you’ll see the output. Take a look at the results and adjust your prompt or settings as needed. Don’t hesitate to re-run the workflow for refinement until you achieve the desired angle and quality.
 Example Prompt:
Turn the camera to a close-up side-view. Show the desert landscape behind him, with a majestic dragon flying toward him, its scales glinting in the moonlight and wings spread wide.
Congratulations! You’ve just completed your first image angle edit with Qwen Image Multi-Angle!
5. BONUS: Qwen Image Edit Multi-Angle GGUF Workflow
For users operating in low-VRAM environments, the GGUF variant of the Qwen-Image-Edit-Multi-Angle workflow offers a practical alternative.
Qwen-Image-Edit-Multi-Angle GGUF Workflow
To run locally without a high-end GPU, the main difference is that instead of the FP8 diffusion model, you’ll need Qwen_Image_Edit-Q3_K_S.gguf (or any other GGUF version that fits your VRAM). You can see the available GGUF model downloads here: 👉 Qwen Image Edits GGUF model versions on Hugging Face
That’s the only extra requirement—everything else stays the same. You’ll still use (see Section 2 for downloads):
-
Qwen-Image-Edit-Lightning 4-Step LoRA for fast edits
-
Qwen-Image-Edit-Multi-Angle LoRA for angle transformations
-
VAE for decoding
-
Text/Clip Encoder for prompt processing
This allows you to run the Qwen Image Edit Multi-Angle GGUF workflow fully locally while keeping all the same functionality and control as the FP8 workflow.
Verify Folder Structure
ts1📂 ComfyUI/
2├── 📂 models/
3│   ├── 📂 diffusion_models/
4│   │   └── Qwen_Image_Edit-Q3_K_S.gguf   # GGUF diffusion model
5│   ├── 📂 loras/
6│   │   ├── Qwen-Image-Edit-Lightning-4steps-V1.0.safetensors
7│   │   └── Qwen-Image-Edit-Multi-Angle.safetensors
8│   ├── 📂 vae/
9│   │   └── qwen_image_vae.safetensors
10│   └── 📂 text_encoders/
11│       └── qwen_2.5_vl_7b_fp8_scaled.safetensors
Once the GGUF diffusion model is in place, you’re ready to run the Qwen-Image-Edit-Multi-Angle workflow entirely on your local machine.
Step 1: Download the GGUF Workflow File
Download the workflow JSON specifically configured for the GGUF diffusion model:
👉 Download Qwen Image Edit Multi-Angle GGUF Workflow JSON
Step 2: Load the Workflow in ComfyUI
Once you’ve downloaded the workflow file, launch ComfyUI and drag and drop the JSON file onto the canvas to load the full setup. This action will prepare the environment for working with the Qwen GGUF model locally.

This allows you to run the Qwen Image Edit Multi-Angle GGUF workflow fully locally while keeping all the same functionality and control as the FP8 workflow.
6. EXTRA: Run Qwen Image Edit Multi-Angle on Next Diffusion
Want the easiest way to use the Qwen Image Edit Multi-Angle workflow—no installs, no setup, no GPU hassles? You can now run the entire workflow directly on Next Diffusion, fully preconfigured and ready to go.
Just open your dashboard, spin up a GPU pod, and the workflow loads instantly.

With Next Diffusion, you get:
-
The Qwen Image Edit Multi-Angle workflow ready out-of-the-box
-
Fast cloud GPUs
-
Zero technical setup
-
Smooth, reliable image editing and angle transformation
Ready to start?
👉 Head over to your Next Diffusion Dashboard and spin up a GPU Pod to begin.
7. Conclusion
This tutorial has guided you through using Qwen-Image-Edit-Multi-Angle in ComfyUI with both FP8 and GGUF models, integrating Lightning LoRA for fast, high-quality angle transformations. Users with high-end GPUs can leverage FP8 for maximum performance, while the GGUF variant allows low-VRAM setups to run locally without sacrificing quality.
Want to expand your visuals into storytelling? You can easily create narratives from your frames with different angles—WAN image-to-video is a great starting point: 👉 FAST Image to Video in ComfyUI (Wan2.2 & Lightning LoRA)
This guide equips you to explore the full potential of Qwen Image Multi-Angle. Keep experimenting with angles, prompts, and workflows to elevate your creative projects.


