How to Use Stable Diffusion's Multi-Diffusion Extension for Image Upscaling
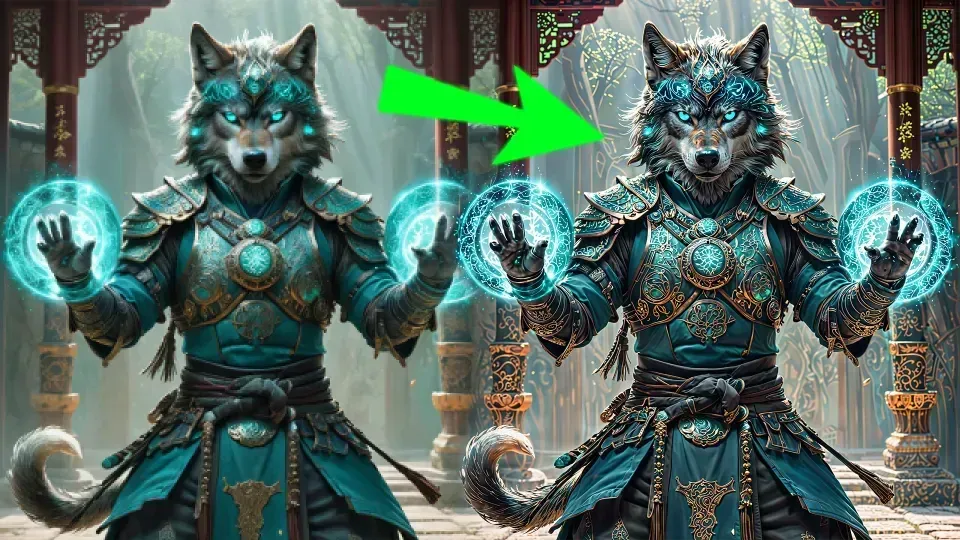
Table of Contents
1. Introduction
In the age of digital imagery, enhancing the quality of your pictures doesn’t have to come with a hefty subscription price tag. Imagine being able to run magnific AI locally, right on your own computer. With Stable Diffusion’s Multi-Diffusion Extension, that possibility becomes a reality. This powerful tool allows you to effortlessly add intricate details and upscale your images, achieving results that can rival those of premium cloud-based solutions. In this blog post, we will delve into how you can utilize this extension for enhancing your images like never before.
2. Requirements for Image Upscaling (Stable Diffusion)
Before diving into the image enhancement process, it's crucial to ensure you have the right tools at your disposal. Here’s what you’ll need:
-
ControlNet Extension & ControlNet Tile Model: The first requirement is ControlNet and the ControlNet Tile model. ControlNet is a must have extension for Stable Diffusion, I recommend watching our tutorial on How to Install ControlNet if you don’t have it installed already!
-
Multi-Diffusion Extension: Sometimes referred to as Tiled Diffusion, this extension is essential for the work we’re about to embark on.
To install the Multi-Diffusion extension, follow these steps:
-
Open your Automatic1111 interface.
-
Navigate to the Extensions tab.
-
Click on Install from URL and paste the correct GitHub link (https://github.com/pkuliyi2015/multidiffusion-upscaler-for-automatic1111.git).
-
After installation, check for updates and click Apply. Restart the UI to ensure everything is up to date.
3. Creating Your Base Image
Before we can start adding details and upscaling our image, we need a starting image. I will quickly create an awesome image with the ZBase-XL checkpoint together with the XL Weapon Spell Rings LoRA. Alternatively you can choose any image you like.
-
Prompt: a wolf warrior standing on two legs in a fighting stance, he is wearing medieval samurai armor, he has a magical turquoise aura around him, intricate details, turquoise <lora:XL_Weapon_Ring_Spells_-_By_HailoKnight:0.7> Spell rings
-
Negative prompt: cartoon, blurry
-
Sampling method: DPM++ 2M Karras
-
Sampling steps: 30
-
Width & Height: 1024x1024
-
CFG Scale: 5
-
Seed: 2336269327
 This step is optional but I will now run the image with the same seed again with Hires. Fix enabled. For the upscaler I will use 4x-UltraSharp. Set “Upscale by” to 2 and decrease the “Denoising strength” to somewhere between 0,1 and 0.3.
 Don’t forget to enable it and use the same seed for the generation. Now hit Generate again.
4. Upscale & Add detail with Multidiffusion (Img2img)
Once you have your base image ready we can send it to image-to-image by pressing the little painting under the image.
 If you want to use a different image you can simply drag and drop your image onto the img2img canvas.
img2img Settings
The first thing we need to change is our checkpoint to a SD 1.5 checkpoint, unfortunately Multidiffusion does not work properly with SDXL models yet as it results in the image having a pattern overlay, the creator is working on this so hopefully soon we can use this with SDXL models.
-
Checkpoint: Juggernaut (this is a good all round checkpoint to use covering all sorts of styles.)
-
Modify prompts by removing descriptive keywords.
-
Prompt: hyper detailed, intricate details, extreme quality, 8k, HDR
-
Negative prompt: cartoon, painting, illustration, (worst quality, low quality, normal quality:2)
-
Sampling method: DPM++ 2M Karras
-
Sampling steps : 30
-
Denoising strength: low value (between 0.3 and 0.6) to maintain the image or use a higher value to add more details
 ### Tiled Diffusion Settings
Scroll down, open the Tiled Diffusion extension and enable it.
-
Change the Method from MultiDiffusion to Mixture of Diffusers, there is not much difference between the two but the creator of the extension recommends Mixture of Diffusers.
-
Set the Latent tile width & height to 128, and depending on your VRAM you can increase the Latent tile batch size. With 8GB of VRAM I recommend leaving it at 4.
-
For the Upscaler I will use 4x-Ultrasharp, but you can choose anything you like.
-
A good pre-installed upscaler is R-ESRGAN 4x.
-
Leave “Scale Factor” at 2 for a 2x upscale.
 ### Noise Inversion Settings
Noise inversion is where the magic happens, this will add a lot of details to your image. Enable Noise Inversion and set the “Inversion Steps” to 50. Reducing the “Renoise Strength” adds detail, if you set this all the way to 0 I recommend increasing the Denoising strength to around 0,75. You can play around with these settings as there is no “perfect” setting that will work for everyone, a good starting point is 0,10.
 ### Tiled VAE Settings
Lastly scroll down and enable the Tiled Vae extension. Here we will only enable the “Fast Encoder Color Fix” option. This makes sure our image stays vibrant and doesn’t lose color or will look washed. The Encoder Tile Size is adjusted automatically based on your GPU’s VRAM.
 ### ControlNet Settings
The last thing we need to do is enable ControlNet, scroll down and open the extension. Check the Enable and the Pixel Perfect checkboxes.
Now change the following settings:
-
Pixel Perfect: Yes
-
Control Type: Tile/Blur
-
Preprocessor: tile_resample
-
Model: control_v11f1e_sd15_tile
-
Control Mode: ControlNet is more important
 Now go ahead and click Generate! This may take a minute or 2 depending on the size of your image and the speed of your GPU. The larger your image, the longer the process.
5. Tips for faster Generation & More
-
Start with a Smaller Image
- Begin with a smaller resolution, such as 2048x2048, and upscale as needed.
- While 2048x2048 is already large, you don’t need to start at this size.
-
Optimize Upscaling Settings
- Reduce the “Upscale By” value in the Hires. Fix settings.
- Adjust the “Scale Factor” in the Tiled Diffusion settings:
- Set the Scale Factor to 1 if you don’t plan to upscale for added detail.
- This significantly increases generation speed.
-
Experiment with Noise Inversion
- Use the “Retouch” setting to introduce more variation to your image.
- Be cautious—this setting is very sensitive:
- A value of 2 can cause noticeable changes.
- Changes amplify if your Renoise Strength is very low.
-
Control Image Contrast
- Lower the CFG Scale to reduce contrast and avoid artifacts in your image.
-
Adjust Latent Tile Overlap
- The default value for “Latent tile overlap” in the Tiled Diffusion section is 48.
- You can reduce this to as low as 8 if desired.
6. Conclusion
By following this guide, you now possess the tools and knowledge to enhance your images locally using Stable Diffusion's Multi-Diffusion Extension. This approach not only saves you money but also allows for a level of creative control and personalization that cloud-based solutions often lack. Remember to experiment, refine your techniques, and most importantly, enjoy the process of transforming ordinary images into extraordinary works of art. Happy enhancing!


