Multi-Image Flux Kontext Dev Workflows in ComfyUI

Table of Contents
1. Introduction
Flux Kontext Dev is best known for context-aware edits: repaint a T-shirt, extend a background, re-pose a figure, all without ruining the surrounding pixels. Yet real-world design briefs rarely stop at one image.
-
“Blend this fashion-model portrait with the fabric swatch.”
-
“Merge the render with this sunset photo so shadows match.”
In traditional workflows you’d pass those tasks to Photoshop for compositing, then return to the model for stylisation. But ComfyUI lets us stay inside the diffusion graph by feeding multiple reference pictures straight into Flux Kontext. This guide shows two ways to do it, explains why you’d pick one over the other, and shares the prompt tricks that keep seams and colour shifts at bay.
If you can already run Flux Kontext Dev on your GPU 🡒 you can follow along; nothing else to install.\
If you don’t have Flux Kontext installed yet, follow this guide.
Flux1 Kontext Dev Model for ComfyUI: Image Editing Made Easy
2. Why Multi-Image?
When you combine reference latents you unlock new use-cases: style transfer plus identity lock, multi-angle character turnarounds, background swaps that inherit the lighting of a location shot… The table below highlights a few examples, but the short version is: whenever two pictures tell different parts of the story, multi-image Flux will let the model “see” both simultaneously instead of guessing.
| Scenario | Single-image Limitation | Multi-image Benefit |
|---|---|---|
| Outfit swap | Outfit must already be present in subject photo | Subject photo + outfit flat-lay produce perfect fit |
| Matte-painting | Model invents lighting for the new sky | Second photo provides authentic golden-hour hues |
| Merchandise mock-up | Incorrect logos/placement | Logo PNG as second reference gets copied perfectly |
3. Requirements & Downloads Flux Kontext Dev
All files are small enough for a single coffee-shop Wi-Fi session. Place them in the usual ComfyUI folders:
| Asset | Download Location | Folder |
|---|---|---|
| flux1-kontext-dev-Q6_K.gguf Flux Kontext Dev (GGUF) | Hugging Face | models/diffusion_models |
| Flux Kontext FP8 (Larger model) | Hugging Face | models/diffusion_models |
| t5xxl_fp16.safetensors (text encoder) | Hugging Face | models/clip |
| clip_l.safetensors (image encoder) | Hugging Face | models/clip |
| ae.safetensors (VAE) | Hugging Face | models/vae |
| Flux Kontext Multi Image Chaining.json Workflow A | Download | anywhere |
| Flux Kontext Multi Image Stitching.json Workflow B | Download | anywhere |
Simply swap the Load Diffusion Model node for the UNET Loader (GGUF) node if you want to run the GGUF version, keep the rest the same.
4. Workflow A — “Chained Reference Latents”
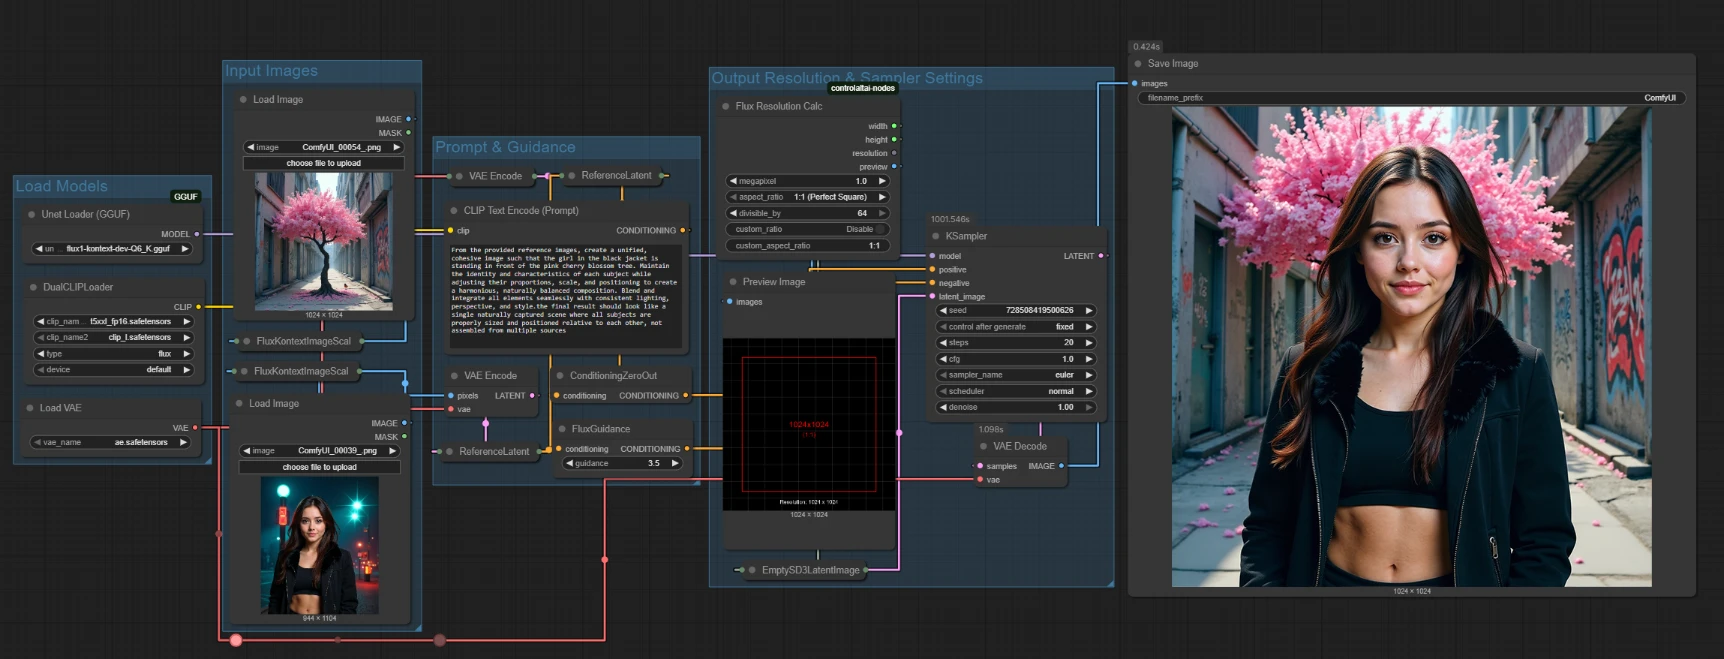
Best for: precision work where each image should influence the output independently (e.g., face and background, clothing and pose). Trade-off: two encodes → much slower and more VRAM head-room needed.
How it works
-
Input images· Loads two images for Flux Kontext to work with.
-
Match resolution · Each image is auto-resized by a Flux Kontext Image Scale node.
-
Latent #1 joins the prompt · Reference Latent A blends the first image with your text prompt.
-
Latent #2 stacks on top · Reference Latent B adds the second image to the same conditioning stream—now the model “knows” about both references separately.
-
Flux Guidance mixes the ingredients · Positive text + both images are combined into guidance for sampling.
-
Blank canvas appears · Empty SD3 Latent Image creates an empty canvas for the ksampler.
-
KSampler paints · Guided by the mix above, the sampler iteratively transforms the blank canvas into a finished image.
-
Back to RGB · VAE Decode converts the final latent to a normal image, which is then previewed or saved.
What you might tweak:
| Setting | Why change it? |
|---|---|
| Flux Guidance scale | Fine-tunes overall adherence to both prompt and references. |
| Output size in Flux Resolution Node | Larger canvas for posters, smaller for quick drafts. |
| Sampler steps / type | More steps = crisper detail; fewer = faster. |
Pro tip: Because each reference is an independent node, you can even blend three or four pictures by adding more ReferenceLatents — the trade-offs scale linearly with each extra encode.
5. Workflow B — “Stitched Canvas”
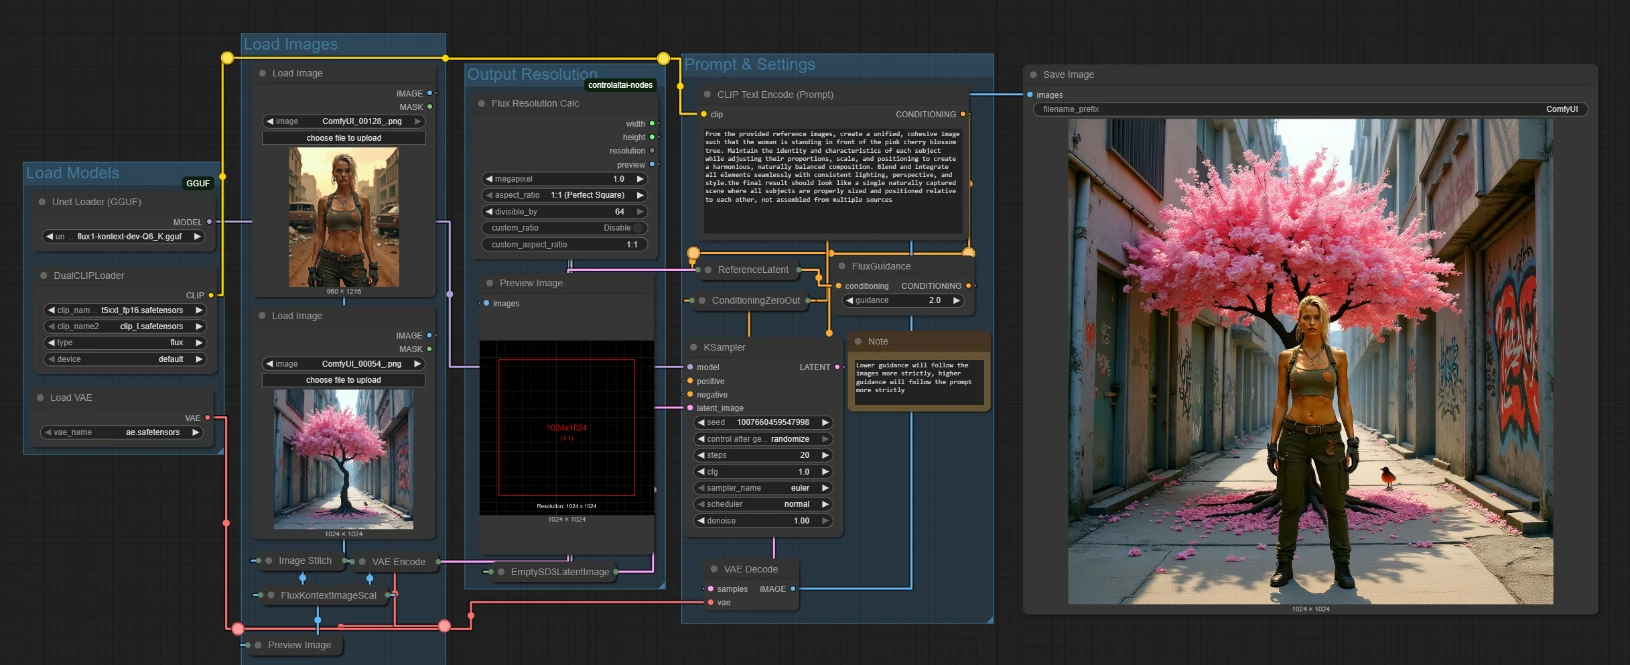
"Best for: quick drafts, outfit merges, or when both references share similar lighting and perspective. Trade-off: less granular control
How it works
-
Images enter · Same two Load Image nodes.
-
On-the-fly collage · Image Stitch glues them side-by-side (or top-bottom) into one wide canvas.
-
Fit to model · The stitched canvas is resized by Flux Kontext Image Scale to set a resolution Flux Kontext is familiar with.
-
Single latent · One VAE Encode turns the composite into a latent tensor.
-
Reference Latent attaches it · That single latent joins your text prompt as a unified conditioning block.
-
Sampler paints · KSampler generates the final latent—quicker than Workflow A because there’s only one encode to back-prop through.
-
Decode & save · VAE Decode → preview / file output.
What you might tweak:
| Setting | Typical use |
|---|---|
| Output size (Flux Resolution Node) | Larger canvas for posters, smaller for quick drafts. |
| Flux Guidance scale | Slightly higher (3–4) helps guide the prompt |
| Sampler steps | More steps = crisper detail; fewer = faster. |
Choosing a workflow
-
Need separate weights or three+ references? → Workflow A
-
Need speed or a simple background swap? → Workflow B
Drop the JSON into ComfyUI, plug in your images and prompt, nudge a handful of sliders if needed—that’s all there is to multi-image magic with Flux Kontext Dev.
6. Side-By-Side Cheat Sheet
| Feature | Chained Latents (A) | Stitched Canvas (B) |
|---|---|---|
| Separate weights | ✅ Possible | ❌ |
| Extra VRAM needed | ✅ | ❌ |
| Processing speed | slower | faster |
| Ideal for | Divergent refs (subject + backdrop) | Similar lighting, background swaps |
7. Flux Kontext Multi-Image Examples
Example 1 - Background Transfer

Example 2 - Clothing Transfer

Example 3 - Inserting In a Scene

8. Conclusion
Multi-image Flux Kontext Dev turns ComfyUI into a lightweight compositor. By choosing between Chained Latents and Stitched Canvas you trade a little VRAM for a lot of creative control, or vice versa. The best workflow is the one that meets your current deadline:
-
Need iteration speed for art-direction reviews? Stitch.
-
Need pixel-perfect identity locks? Chain.
Either route keeps you inside a single diffusion pass, running entirely on-device, with results your art director can sign off in minutes.


